


In this tutorial, you'll learn how to how to create a retro-style typography poster design. This typeface poster is fun and easy to put together.
For this poster typography design, I chose a super cool font from Envato Elements, Overgreed. This awesome font is in a blackletter style with a modern twist and soft curves. You'll learn how to make a typography poster in Photoshop that's colorful, how to create a trendy gradient background, and how to distort a graphic design typography poster.
Envato Elements has awesome assets with a rapidly growing library—new items added every day. There you can find fonts, print templates, photography, and other assets that can help you kick your projects up a notch.
What if you don't have the time to read this simple typography poster tutorial? Don't worry, we've got you covered. You can learn how to design a typography poster by watching this new video from the Envato Tuts+ YouTube channel:

What You'll Learn in This Creative Typography Poster Design Tutorial
- How to properly set up a document in Photoshop
- How to create a gradient background
- How to use the Noise filter
- How to use the Liquify filter
- How to use Layer Masks
- How to export a Photoshop file for web and print
What You'll Need
For this simple typography poster tutorial, you'll need the Overgreed font and access to Adobe Photoshop. Overgreed is a modern blackletter font that has soft edges, and it's perfect for display projects and branding.


1. How to Set Up a Document for Your Creative Typography Poster Design
Step 1
Create a New Document in Photoshop for your typeface poster.
Select the A4 size or set the Width to 210 mm and Height to 297 mm. Set the Resolution to 300dpi, and click OK.


Step 2
Go to View > New Guide Layout.
In the pop-up window, check the Columns options and set the Number to 4. Check Rows and set the Number to 4. Check Margin and set all the margins to 1cm. Click OK.


2. How to Create the Background of Your Modern Typography Poster Design
Step 1
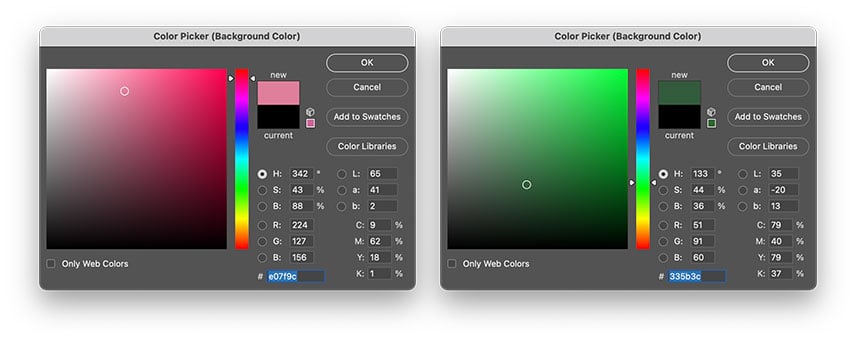
In the Layers panel, select Create New Fill or Adjustment Layer > Solid Color. In the Color Picker window, set the color to #2479af. Click OK.


Step 2
In the Layers panel, click on the Create New Layer button. In the Tools panel, set the Foreground Color to #e07f9c and the Background Color to #335b3c.


Step 3
Select the Brush Tool (B) from the toolbar.
Right-click on the document to open the Brush Tool options. Set the Brush Size to 600 px and the Hardness to 0.
Change the Size of the brush by using [ to Decrease and ] to Increase.


Step 4
Create angled strokes with both colors on the document. You don't have to fill all of it, as long as you leave space for the background to come through. Switch between the two colors by pressing X on your keyboard.
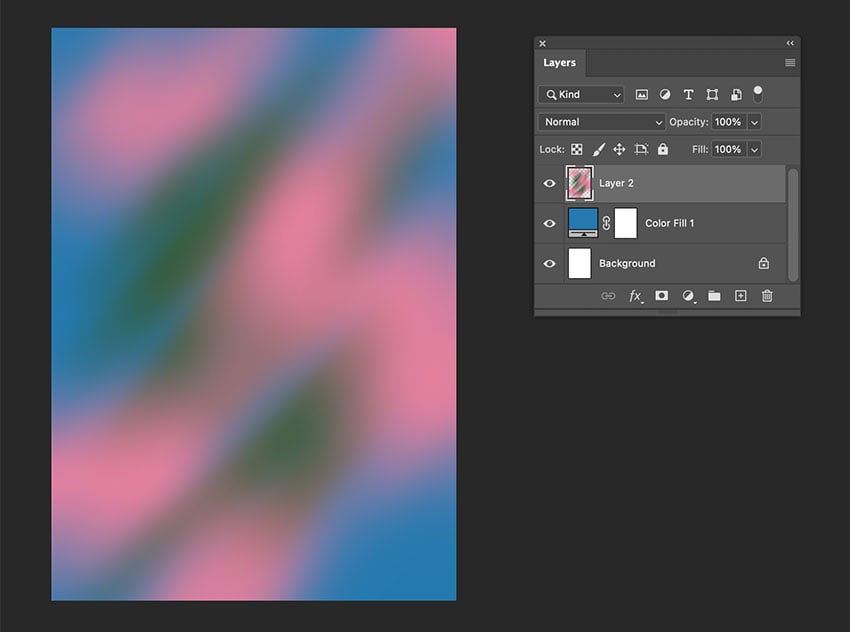


Step 5
Go to Filter > Blur > Motion Blur. Set the Angle to 55 and the Distance to 700 pixels.


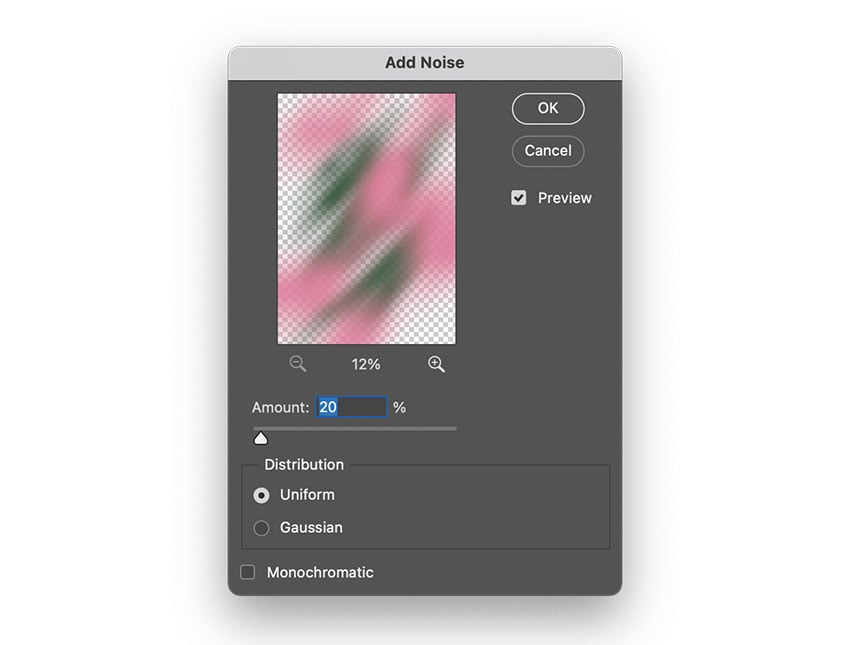
Step 6
Duplicate the layer we just created by dragging to the Create New Layer button.
Go to Filter > Noise > Add Noise. In the pop-up window, set the Amount to 20% and the Distribution to Uniform.


Step 7
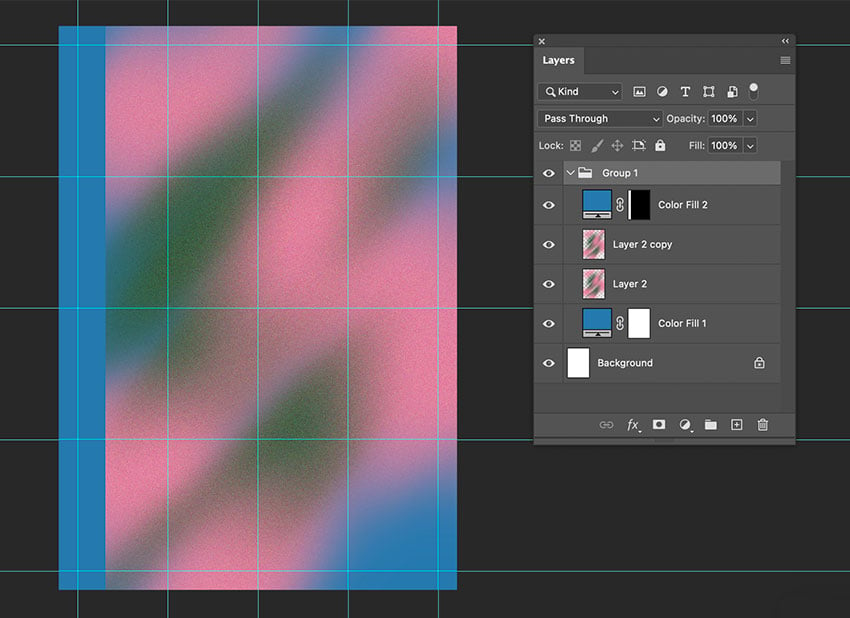
Duplicate the blue Color Fill Layer by dragging it to the New Layer button.
Select the Rectangular Marquee Tool (M) from the toolbar. Select a small stripe from the left side of the poster that matches the height of the poster and is double the width of the margin.


Step 8
With the selection from the step above still active, go to the Layers panel and select the Layer Mask button. Select the four layers by pressing Shift as you click each layer. Then select the Create a New Group button.


3. How to Create the Effect for Your Modern Typography Poster Design
Step 1
Select the Text Tool (T), click on the document, and add the words OVER- on one line and GREED on the next line of your creative typography poster design. Use the space bar to stack the two lines unevenly. The size doesn't need to be exact, but make sure that the words take up the width of the poster.
Drag the Text layer to the Create a New Layer button to Duplicate it.
Hide the copy layer by clicking on the eye icon.


Step 2
Select the Text Layer and head over to Filter > Liquify. In the pop-up window, click on Convert to Smart Object. In the right-side panel, set the Brush Size to 600, Pressure to 100, and Density to 50.
Brush over the text of your typeface poster. Keep in mind that every result will be different. Click OK.


Step 3
Activate the duplicated layer of your typeface poster.
With the Text Tool, delete the second line. Press Command-T to Transform the layer, and move the layer upwards.

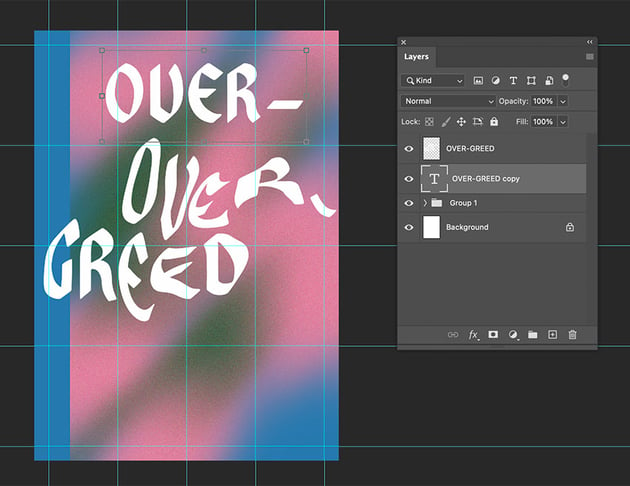

Step 4
Double-click on the layer to open the Layer Style window.
From the left side, select the Stroke option. Set the Size to 10 px, Position to Outside, and Color Swatch to White. Click OK.


Step 5
In the Layers panel, set the Blending Mode to Multiply. This will help transform the letters of your typeface poster from white to see-through.


Step 6
While selecting the layer, click on the Add Layer Mask button. Place the layer over the liquified text of your simple typography poster.
While selecting the Layer Mask, select the Brush Tool (B). Right-click to set the Hardness to 100. Set the Foreground color to Black.


Step 7
Brush over the letters, trying to mold the letters into a similar shape to the liquified text. If you need to correct the layer mask, press X to change to the white background color and brush over the letters again.


Step 8
Duplicate the text layer with the stroke by dragging it to the Create a New Layer button.
Press Command-T to Transform. Move the text slightly up and to the left. This time, drag the Layer Mask to the Delete button.
Using the Marquee Tool (M), create a small rectangle on the lower half of the text. Press Shift-Command-I to Invert the selection.
While you have the selection, click on the Layer Mask button.


Step 9
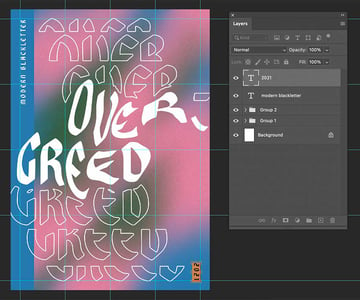
Repeat the step above, but this time delete two-thirds of the text.


Step 10
Duplicate one of the text layers and delete the Layer Mask by dragging it to the Delete button.
Change the text to "GREED".
Repeat steps 6 to 8. This time, move the text towards the bottom right of the poster. Remove the top parts of the text instead of the bottom.
Select all the layers from this section and click on the Create a New Group button.


Step 11
Now we'll add smaller details to the poster. Using the Text Tool (T), add the words "MODERN BLACKLETTER". Set the Font to Overgreed and the Size to 22 pt. Set the Fill Color to White.
Select the text layer and press Command-T to Transform. Rotate the text 90 degrees. Place the text on the top left side of the poster.


Step 12
Duplicate the Text Layer by dragging it to the Create New Layer button. Change the text to "2021".
Select the text layer and press Command-T to Transform. Rotate the text the opposite way. Place the text on the bottom right side of the poster.


Step 13
Using the Text Tool (T), add the letters of the alphabet to complete the typographic poster.
Set the Font to Overgreed v2, Size to 29 pt, Leading to 26 pt, and Tracking to 100. Set the Text Color to White.
Place the text box under the horizontal centerline on the right side of the poster.


4. Exporting a File for Print and Web
Step 1
To finish this tutorial on how to make a typography poster in Photoshop, you'll learn how to export files.
Head over to File > Save As. Set the Format to Photoshop PDF. Click Save.


Step 2
Set the Adobe PDF Preset to High Quality Print. Click Save PDF.


Step 3
To save the file for web, head over to File > Export > Save for Web. Under the Image Size, set the size you would like the image to be.
Click OK, and you're done! Your poster typography design is ready!


5 Similar Blackletter Fonts for a Modern Typography Poster Design
Now that you know how to create a retro-style typography poster design, you might be looking for more cool fonts to experiment with. Visit Envato Elements' huge font library for more inspiration! Here's a hand-picked selection for you:
Pleasure Blackletter (OTF, TTF)


Pleasure is a blackletter font with a modern twist. The thin strokes are slightly thicker to make sure the characters are still legible. This font is perfect for display purposes, posters, web, and even branding.
Distorsi Blackletter (OTF, TTF)


Inspired by metal bands, Distorsi is a blackletter that's more relaxed and fun. Use this font for musical events, merchandise, and even albums. The strokes are quite distinctive, making it even more special.
Bullgine Blackletter (OTF, TTF)


Bullgine is a modern Gothic blackletter font that features thin strokes. The low contrast makes the font elegant, and the condensed characters look modern. The font includes beautiful alternative characters, which can help a brand logo be unique. There are tons of glyphs for you to explore.
Babylon Blackletter (OTF, TTF)


Babylon is a modern blackletter with proportional characters. The curves are soft and extremely legible. Use Babylon for display purposes like posters, branding, and even clothing. Step out of the box and use this awesome font for merchandise.
Clockwork Blackletter (OTF, TTF, WOFF)


Clockwork is a blackletter font created using hand lettering from the 1800s. The font is classic and when used correctly can be made to look modern. The font combines modern and classic typography that includes alternates, so no two characters have to look the same. Use this font for branding, posters, and shirts.
Conclusion
In this tutorial, we created a typography poster design that showcases a single typeface. You learned how to design a typography poster with an awesome colorful background, and how to use the Noise and Liquify filters. You also learned how to master Layer Masks. When properly used, they can give amazing results.
If you're looking for trendy typefaces for poster design, be sure to check out Envato Elements. There, you can find assets for graphic design and typography posters. Their library updates daily, so there are always new assets!

 A to Z of Typography: Terms, Tips, Tricks, and Hacks!


 What Is Expressive Typography?


 How to Create a Floral Typography Text Effect in Photoshop


 The Best Alternatives to the 10 Most Popular Fonts

 What Fonts Are Trending Now and Font Trends for 2022


 How to Choose the Right Font for Your Brand

 Variable Fonts on the Web, Explained


 How to Combine Fonts, How Not To, and the Best Font Combinations


