

Monograms are powerful tools in modern brand design. In this tutorial, I'll show you how to make a monogram in Photoshop. Ready to make a monogram from scratch?
Instead of using a monogram maker, we'll show you how to design a logo with two monogram letters.
Jump to content in this section:
What Is a Monogram?
Before you learn how to make a monogram, get some inspiration from its origins.
Monograms date back to 350 BC. Greek cities were the first to issue coins with the first two letters of the city's name, and monograms have since been used throughout history as a practical way of identifying cities and empires.
They have evolved into a form of brand design. Monograms are motifs made up of two or more letters to form a single unified symbol. Their purpose is to represent a brand, person, or company in a stylish way.

 25+ Best Free Fonts for Monograms & Logos (Download Now!)


 What Is a Monogram? Types, Designs, and Ideas

What You'll Learn in This Monogram Logo Design Tutorial
- How to create a new document in Adobe Photoshop
- How to add guides in Adobe Photoshop
- How to design a monogram logo
- How to use Layer Masks in Photoshop
- How to use Smart Layers in Photoshop
Tutorial Assets
No time to create a monogram? Monogram fonts are available at Envato Elements. To complete this tutorial, you'll need the following fonts:
Before we start our monogram layout, make sure that the fonts are installed in your system and you're ready to create your custom monogram!
1. How to Set Up a Photoshop File for a Monogram Design
Step 1
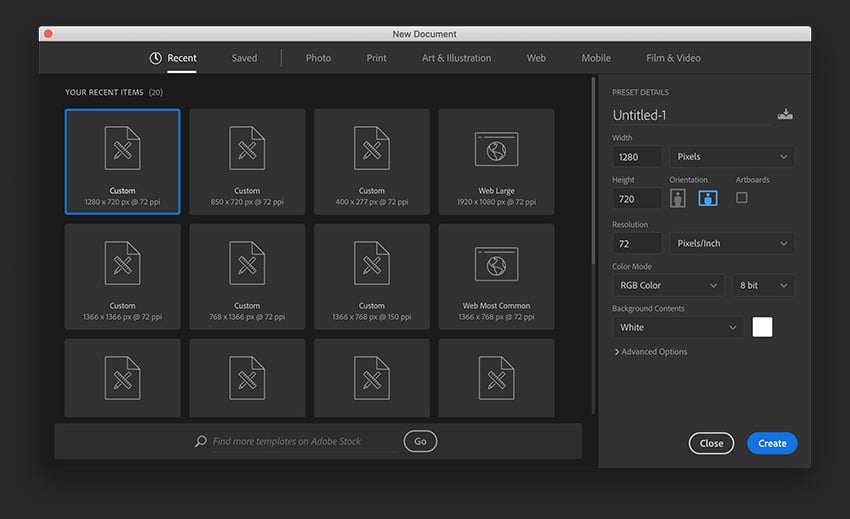
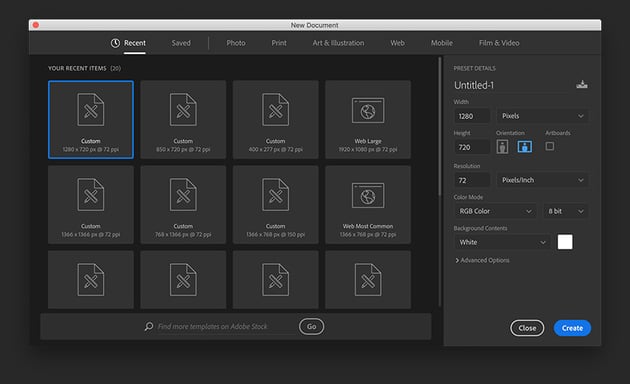
In Photoshop, go to File > New and create a file with the following dimensions:
- Width: 1280 px
- Height: 720 px
- Portrait: Landscape
- Units: Pixels
- Resolution: 72 pixels/inch
- Color Mode: RGB
Click Create.
Step 2
We'll create guides in the document to make sure the monogram design is centered. Head over to View > New Guide Layout. In the New Guide Layout option window, set the number of Columns and Rows to 2 and the Gutter to 0 cm.
Under Margin, maintain the default of 1.27 cm. Click OK.


2. How to Design a Monogram Logo
Step 1
Head over to the Tools panel and select the Text Tool (T). Click on the document to add a single initial; I’ll add "O". Add another text layer with the letter "R". Set the initials to Monogram World 5 Regular in the Character panel.


Step 2
Open the Glyphs panel by going to Window > Glyphs.
In the Glyphs panel, you’ll notice different options for the monogram letters. This specific monogram font contains wide and regular-width characters. In this case, I’ll select the wider "O" from the Glyphs panel. Select the "O" and double-click on the wider "O" in the Glyphs panel to add the character. For the "R", keep the regular width.


Step 3
In the Layers panel, select both monogram letters by pressing Shift and clicking on each layer. Head over to the Options bar and align both letters by clicking on Align horizontal center and Align vertical center. Using the Move Tool (V), place both monogram letters in the center of the document.


Step 4
In the Layers panel, head over to Create New Fill or Adjustment > Solid Color. Add a new solid black layer.


Step 5
In the Layers panel, right-click on the "O" layer and select Blending Options to open the Layer Style window.
In the Layer Style window, check the Stroke option from the left side menu.
For the Stroke option, set the Size to 5 px, Position to Outside, and Color to White.


Step 6
In the Layers panel, right-click on the O layer and select Copy Layer Style. Right-click on the R layer and select Paste Layer Style.


Step 7
To be able to create an interlocking monogram, we need to convert the layers into Smart Objects. Right-click on each layer and select Convert to Smart Objects.


Step 8
In the Layers panel, select the O layer. Click on Add Layer Mask. Repeat this step with the R layer.


Step 9
Select the Brush Tool (B) from the toolbar. Make sure you have the Foreground Color set to Black.


Step 10
In the Layers panel, select the Layer Mask thumbnail on the R layer. While using the Brush Tool, swipe over the areas you’d like to have interlock. For me, those would be the areas where the "R" and the "O" intersect—more specifically, the top-left corner and the bottom-right corner.
Layer Masks are useful to hide and reveal parts of a layer without erasing them. If you make a mistake, you can easily fix it by changing the foreground color to white and perfecting your design.


Step 11
From here, you can get a couple of different results, depending on what you’re looking for. Here are a few examples of interlocking or merged initials.


3. How to Add Finishing Touches to the Monogram Logo
Step 1
Use the Text Tool (T) to add a text layer. I added "Oregon". Use the Characters panel to change the settings. Set the text Size to 50 pt and the Tracking to 100.


Step 2
With the Text Tool (T) activated, head over to the Options bar. Select the Create Warped Text button. In the Warp Text options window, set the Style to Arc, select Horizontal, and set the Bend to +25%. Click OK.
Place the text over the monogram.


Step 3
Using the Text Tool (T), add another text layer. I added "Rugby Team". Use the Characters panel to change the settings. Set the text Size to 50 pt and the Tracking to 100.
With the Text Tool (T) activated, head over to the Options bar. Select the Create Warped Text button. In the Warp Text options window, this time set the Style to Arc, select Horizontal, and set the Bend to -25%. Click OK.
Place the text under the monogram layout.


Step 4
Last, we’ll add "ESTD." and "1998" on each side of the monogram logo. Select the Text Tool (T), and create one layer to add "ESTD." Using the Character panel, set the font to Calderock, the Size to 30 pt, and the Tracking to 200.
Duplicate the layer by pressing Option and dragging the text towards the right. Additionally, press Shift to maintain the same horizontal or vertical alignment.
Select the Text Tool (T) and change the text to a year.


Step 5
From here, you can change the color of your design. Remember that we created Smart Layers for the initials. To edit the color, double-click on the Smart Layer. A new Photoshop file will open with the Smart Layer. Select the layer and open the Character panel to change the color. Once you’ve changed the color, press Command-S to Save the edits.
Close the window and you’ll see the new color in the design.


Step 6
Repeat the same step with the other initial of the monogram design.
I also went ahead and changed the color of the background through the Color Fill layer and recolored the text.


Step 7
To add dimension to the monogram design, we can add a drop shadow. Select both initial layers by pressing Command and clicking on one layer and then the second layer. Right-click and select Duplicate Layers.
Select both duplicated layers, right-click, and select Merge Layers.
Right-click on the merged layer and select Blending Options. Check and select the Drop Shadow from the left menu. Set the Blend Mode to Multiply, Opacity to 30%, Angle to 130, Distance to 25 px, Spread to 20%, and Size to 80 px. Click OK.


Step 8
Right-click on the merged layer and select Copy Layer Style. Select all four text layers added on each side of the monogram design. Right-click and select Paste Layer Style.


Congratulations, You're Done!
In this tutorial, you learned what a monogram is. Knowing how to make a monogram logo is essential for creating awesome brands. Wondering how to create a logo in Photoshop? This tutorial can be a beginner guide.
Below, you'll find a quick monogram maker that can save you lots of time. Designing your monogram online is a quick way to freshen up your brand!
If you're looking for monogram fonts, make sure to check out Envato Elements. They have an extensive library to be discovered.
Looking for a three-letter monogram maker? Or even a wedding monogram maker? Placeit is an excellent monogram generator. Get your own custom monogram online in just a few minutes.


Unique Monogram Fonts From Envato Elements
Now that you know how to make a monogram, you are ready to create a logo in Photoshop! You'll need a cool and original font to make a unique monogram.
Here are five fonts to inspire you to create a monogram:
1. Retro Pica: Decorative Vintage Font (OTF)


This vibrant display font with vintage flair could work for an original monogram layout. It's great for design work like branding and posters, boasting numerous alternate characters. This font also comes with alternate uppercase characters.
2. Art Deco Monogram Font (OTF, WOFF)


Looking for something classic? Create a monogram with this Art Deco Monogram Font. It offers three weights and blends tall, narrow uppercase letters with wider, shorter ones for versatile combinations. You can simply overlay a tall and a short letter to make a monogram that's classic and beautiful.
3. Maple Peachy (TTF, OTF, WOFF)


Maple Peachy is a modern retro font with a blend of elegance and style. It's a standout choice for everything from wedding invitations to logos. Instead of looking for a wedding monogram maker, make a monogram with this font. This download includes regular and italic styles, special ligatures, and multilingual support.
4. Monogram Holder Display Font (TTF, OTF, WOFF)


Experiment with this serif display font designed to make monograms. You can create over 450 unique two-letter combinations by pairing uppercase and lowercase letters. It comes with various widths, alternate glyphs, numerals, symbols, and punctuation. It also features multilingual support with PUA encoding.
5. Monogram World Serif (OTF)


Check out this specialized serif font crafted to make monograms with seamless designs. It offers Regular and Bold weights, blending tall, narrow uppercase letters with wider, short-bodied versions. This download includes over 380 monogram ligatures, a bonus of 20 badges, and 10 high-resolution textures.
More Monogram and Logo Design Tutorials
If you liked this tutorial on how to make a monogram, you might like these:

 30 Best Fonts for Making Monograms & Logo Designs in 2024


 25+ Best Free Vintage Fonts (Free & Premium to Download!)

 25+ Free SVG Fonts (Font Files to Download Now)

 25+ Best Free Hand-Lettering Style Fonts (Designs for 2024)

 The Must-Have Fonts for Graphic Designers and Font Lovers


 How to Make a Banner With an Online Banner Maker


