Building a UWP Document Scanning App
Step-by-step guide to building a UWP app for document scanning, from ideation to deployment.
Note: This article has been contributed by Eric Parker from Dynamsoft.
The Universal Windows Platform (UWP) allows us to develop apps for various Windows devices and distribute them through the Windows Store. It is a modern technology from Microsoft, used for building client apps. UWP apps can take advantage of the latest visual styles and features available in the newest versions of Windows.
Dynamic Web TWAIN (DWT) is a JavaScript library used for document scanning. If you want to create a document scanning app for UWP, you can achieve this by using UWP’s WebView control.
The WebView control enables you to embed a web view within your UWP app, which can display web content using the Microsoft Edge Legacy rendering engine.
This approach results in a hybrid app, combining both native UWP controls and a web page to deliver the functionality you need.
In this article, we will provide step-by-step instructions for creating your own UWP document-scanning app.
Overview of Building a Document Scanning App in UWP
To develop a document scanning app in UWP, you can follow these steps:
- Start by using the Universal Windows App template to create a new project for your app.
- Next, copy the resources folder and demo files from the Dynamic Web TWAIN library into your project.
- Then, add a WebView control to your app’s UI and load the HTML file.
- Customize your app’s behavior for scenarios where Dynamic Web TWAIN is not installed on the system.
- Utilize the capabilities of the Windows Runtime API to enhance your app’s functionality.
Requirements
The requirements for this project are as follows:
- Installation of Visual Studio along with the Windows 10 SDK.
- The Dynamic Web TWAIN library.
Create a UWP Document Scanning App
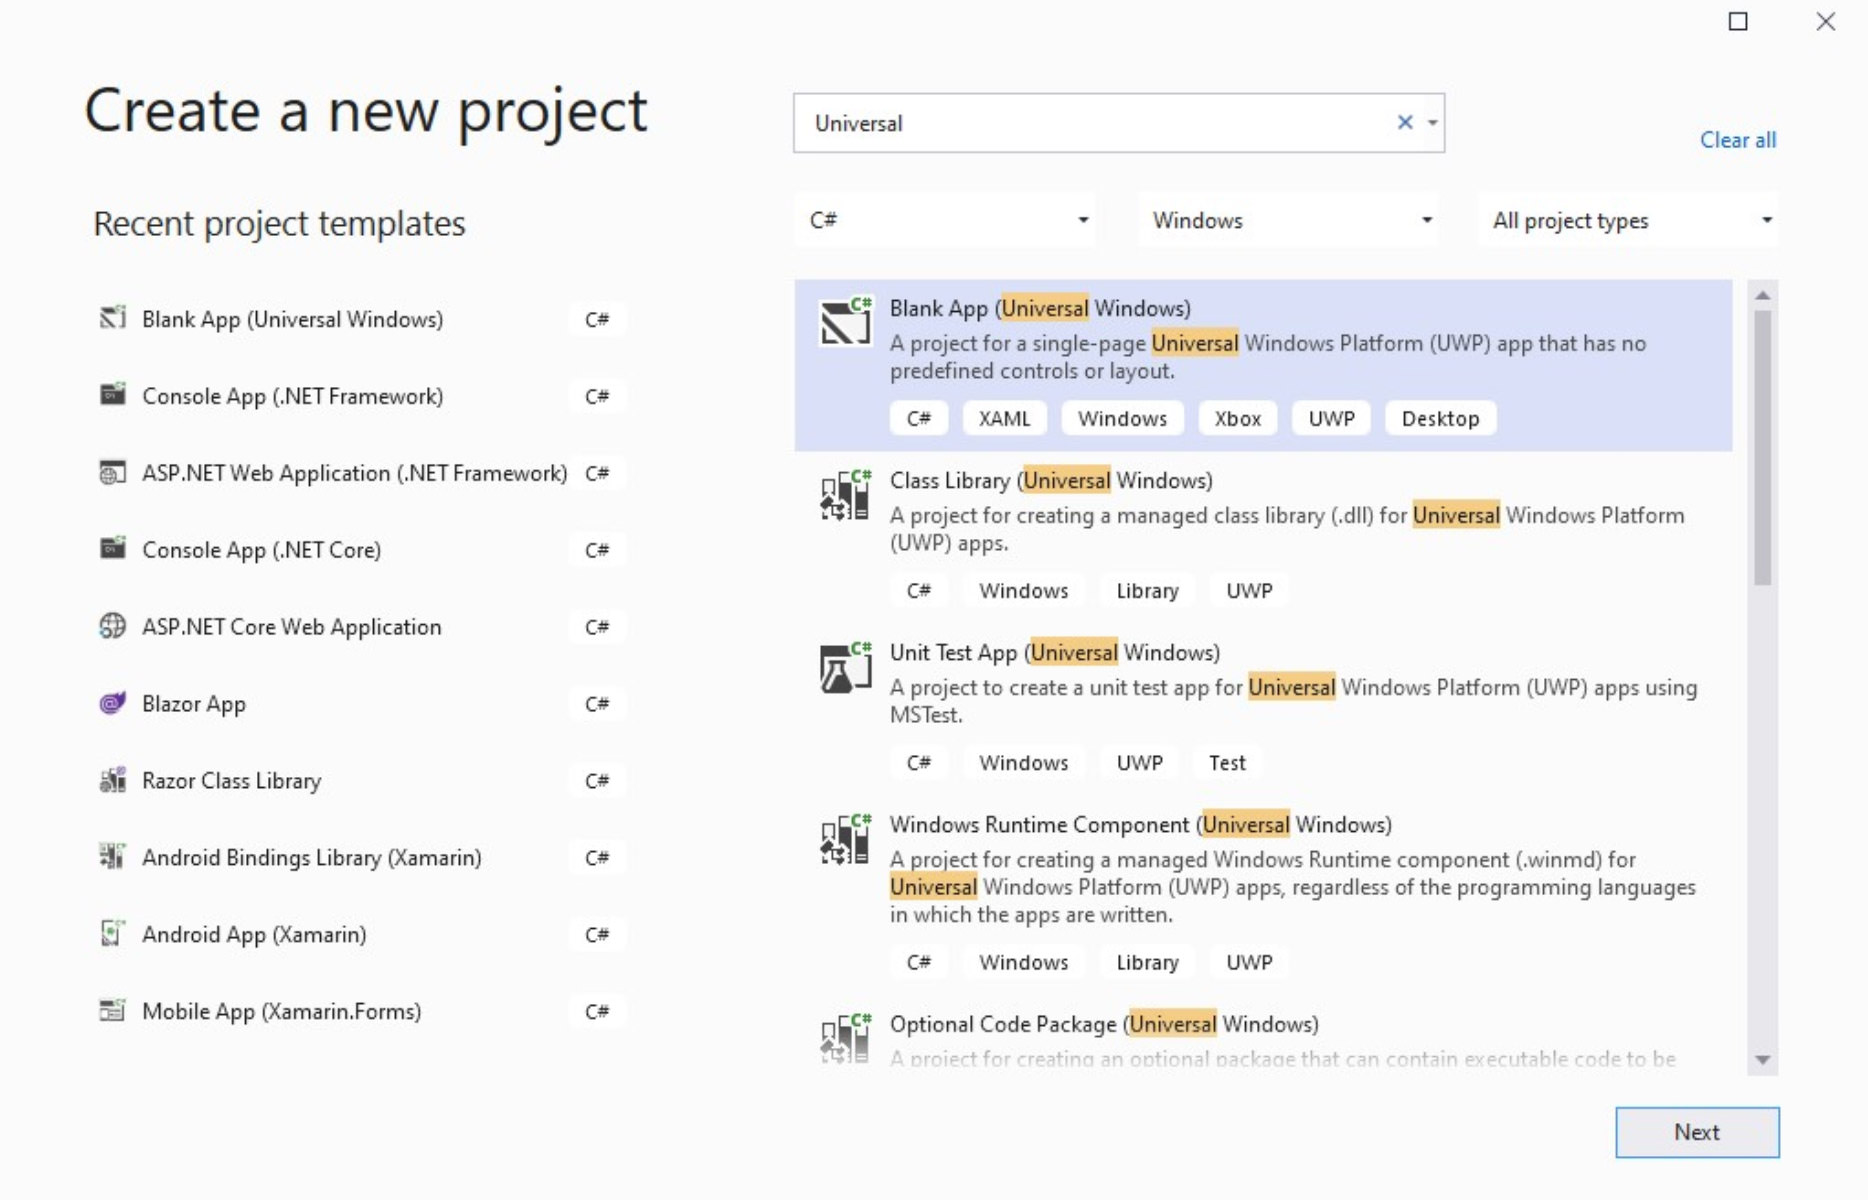
Start a New Universal Windows App Project
To begin, open Visual Studio and create a new project for a Universal Windows app.
Copy the Dynamic Web TWAIN Resources Folder and Demo to the Project
To copy the Dynamic Web TWAIN (DWT) resources folder and demo, please follow these steps:
- Create a new folder and name it “DWT.”
- Click this link to download the HTML, CSS, and JavaScript files for the pre-built demo. Place the downloaded files into the “DWT” folder you created in Step 1.
- Copy the Resources folder from
C:\Program Files (x86)\Dynamsoft\Dynamic Web TWAIN SDK 18.3\to the DWT folder. Note that the exact path may vary depending on your computer’s setup.

Create a WebView Control and Load the HTML File
- Modify the
MainPage.xamlfile using the code provided below:
<RelativePanel>
     <WebView x:Name="WebView1" RelativePanel.AlignTopWithPanel="True" RelativePanel.AlignLeftWithPanel="True" RelativePanel.AlignRightWithPanel="True" RelativePanel.AlignBottomWithPanel="True" LoadCompleted="WebView1_LoadCompleted"/>
 </RelativePanel>
- Upon launching the app, update the
MainPage.xaml.csfile to point the WebView to the HTML file.
public MainPage()
{
    this.InitializeComponent();
    WebView1.Navigate(new Uri("ms-appx-web:///DWT/index.html"));
}
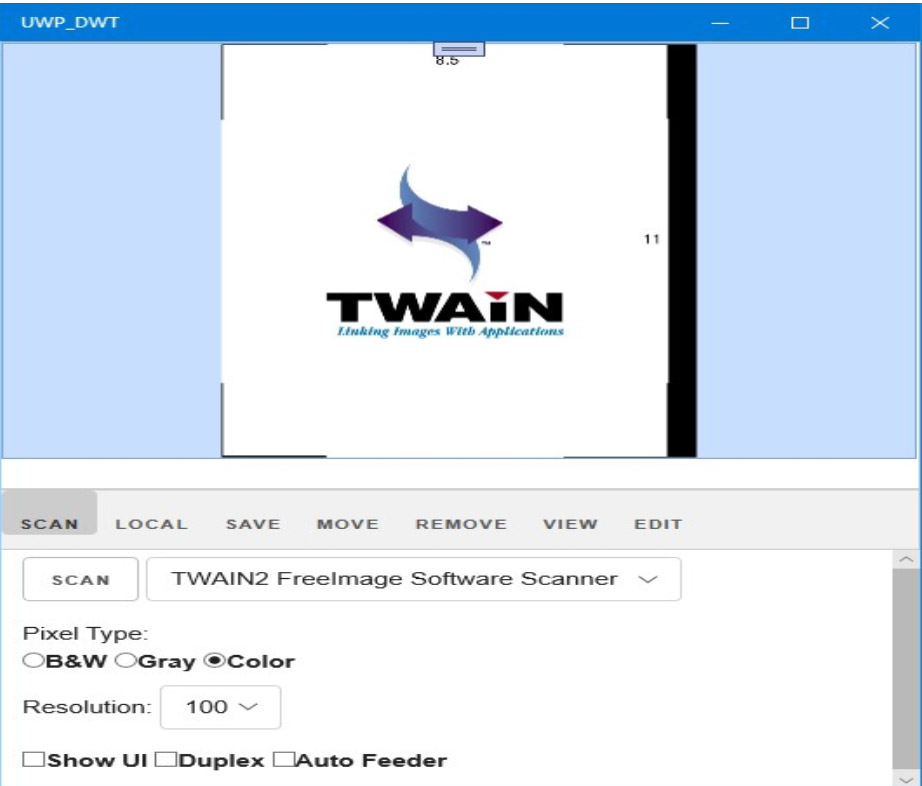
If Dynamic Web TWAIN is installed, the document scanning feature should be available within the WebView.
If it is not installed, you may see the following dialogue box:
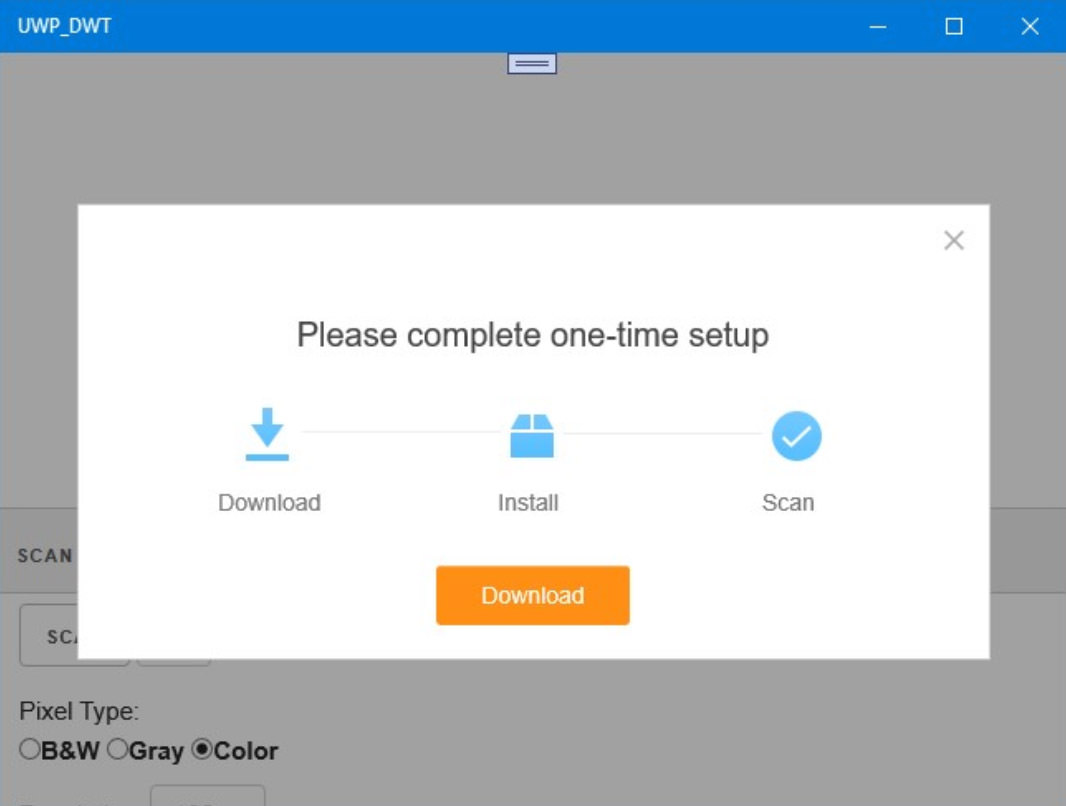
Note: To utilize the document scanning functionality, the JavaScript library of Dynamic Web TWAIN needs to communicate with a local service. Users must install this service before using the scanning app.
Override the Default Behavior When Web TWAIN is Not Detected
If Web TWAIN is not detected, a download dialogue box will appear. However, downloading the installer within the WebView is not possible. To work around this, you can open the download link in the device’s native browser.
UWP’s WebView enables web pages to send notifications to the app:
– Utilize window.external.alert in the HTML event handler to send notifications via WebView.ScriptNotify.
Add the following C# code to allow the web page to notify the app:
public MainPage()
{
    this.InitializeComponent();

    // Newly added
    List<Uri> allowedUris = new List<Uri>();
    allowedUris.Add(new Uri("ms-appx-web:///DWT/index.html"));

    WebView1.ScriptNotify += WebView1_ScriptNotify;  // Newly added
    WebView1.Navigate(new Uri("ms-appx-web:///DWT/index.html"));
}

// Newly added
private async void WebView1_ScriptNotify(object sender, NotifyEventArgs e)
{
    // Handles the message
}
First, locate and open the dynamsoft.webtwain.install.js file found in the “Resources” folder. Search for the specific code segment that needs modification and update it as follows:
Dynamsoft.OnWebTwainNotFoundOnWindowsCallback = function(
    ProductName,
    InstallerUrl,
    bHTML5,
    bIE,
    bSafari,
    bSSL,
    strIEVersion
) {
    var response = {};
    response["info"] = "dynamsoft_service_not_running";

    window.external.notify(JSON.stringify(response));
};
With this change, when the web page detects that Web TWAIN is not installed, it will send a JSON-formatted message to the application.
In the C# file, use the following code to prompt the user to download and install the required service:
private async void WebView1_ScriptNotify(object sender, NotifyEventArgs e)
{
var response = JsonConvert.DeserializeObject<Dictionary<string, string>>(e.Value);
string info = response.GetValueOrDefault("info", "");
// Respond to the script notification
if (info == "dynamsoft_service_not_running")
{
// Create and set the content of the message dialog
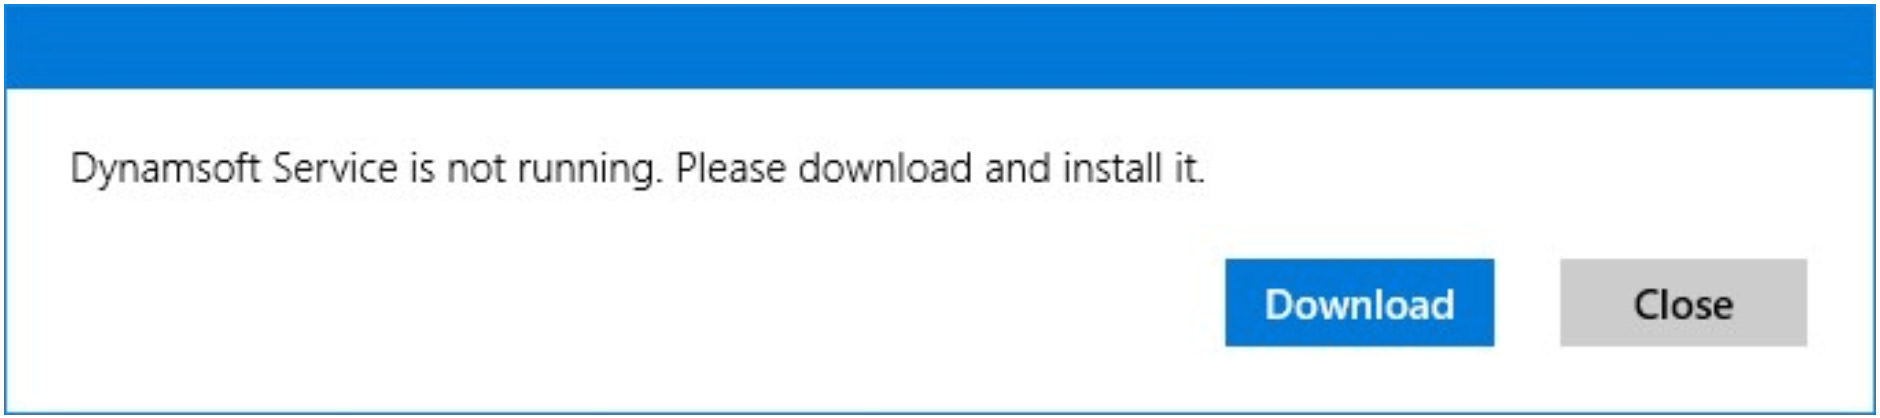
var messageDialog = new MessageDialog("The Dynamsoft Service is not running. Please download and install it.");
// Add commands and their callbacks; both buttons use the same callback function
messageDialog.Commands.Add(new UICommand(
"Download",
new UICommandInvokedHandler(this.CommandInvokedHandler)
));
messageDialog.Commands.Add(new UICommand(
"Close",
new UICommandInvokedHandler(this.CommandInvokedHandler)
));
// Set the default command
messageDialog.DefaultCommandIndex = 0;
// Set the cancel command
messageDialog.CancelCommandIndex = 1;
// Display the message dialog
await messageDialog.ShowAsync();
}
}
private async void CommandInvokedHandler(IUICommand command)
{
if (command.Label == "Download")
{
string uriToLaunch = @"https://download2.dynamsoft.com/Demo/DWT/DWTResources/dist/DynamsoftServiceSetup.msi";
var uri = new Uri(uriToLaunch);
var success = await Windows.System.Launcher.LaunchUriAsync(uri);
}
}
If the service is not active, the following dialog box will appear:
Enhance Functionality with Windows Runtime API
Some features of Web TWAIN are limited in a WebView environment. However, by leveraging the Windows Runtime API for UWP, you can augment the capabilities of your UWP application.
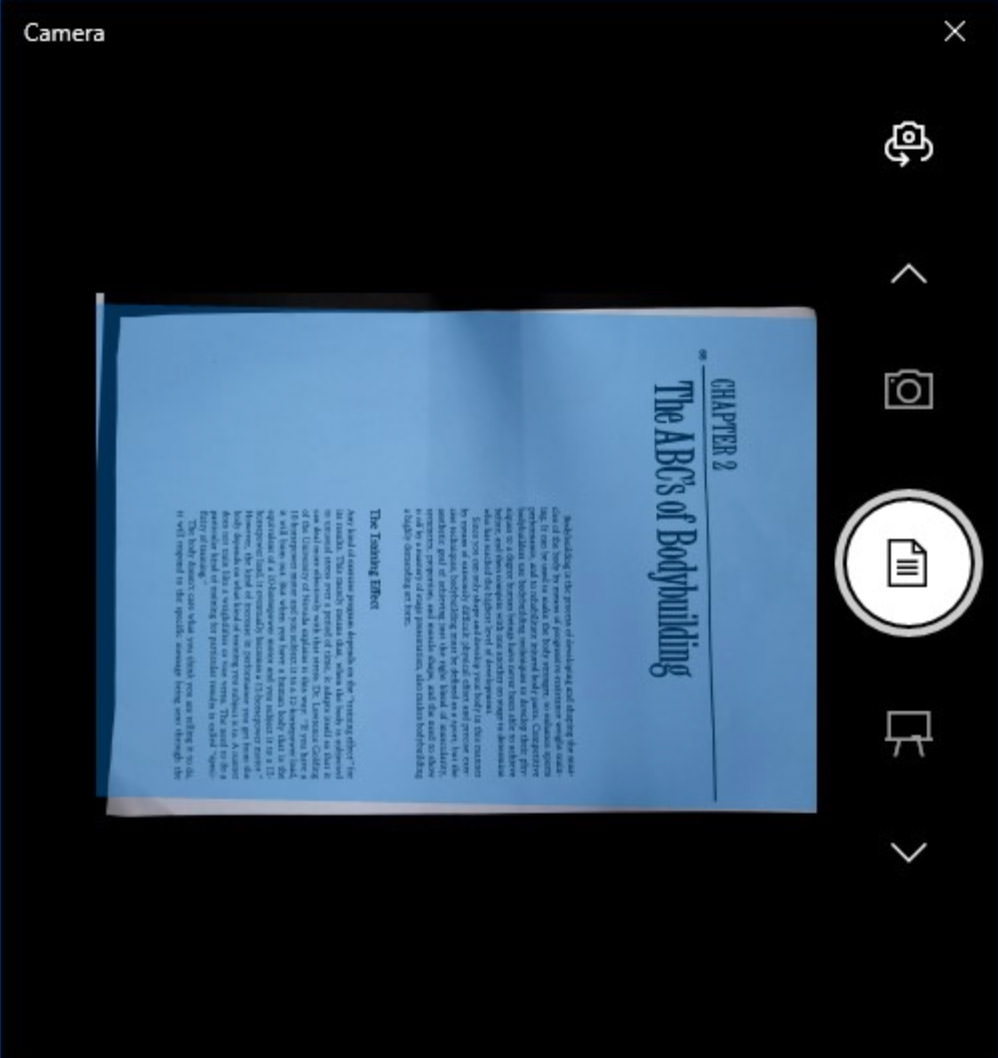
Utilizing the Camera API
The Windows.Media.Capture.CameraCaptureUI API offers an intuitive camera interface for capturing images.
private async void CameraButton_Click(object sender, RoutedEventArgs e)
{
    // Utilize the Windows.Media.Capture.CameraCaptureUI API to capture a photo
    CameraCaptureUI dialog = new CameraCaptureUI();
    dialog.VideoSettings.AllowTrimming = true;

    StorageFile file = await dialog.CaptureFileAsync(CameraCaptureUIMode.Photo);
}
Once triggered, a built-in camera dialog will appear to enable image capturing. The API also provides auto-trimming features useful for document scanning.
Integrating Captured Image into WebView
You can use the WebView.InvokeScriptAsync method to send the captured image to the web page.
private async void CameraButton_Click(object sender, RoutedEventArgs e)
{
    // Capture a photo using the CameraCaptureUI API
    CameraCaptureUI dialog = new CameraCaptureUI();
    dialog.VideoSettings.AllowTrimming = true;

    StorageFile file = await dialog.CaptureFileAsync(CameraCaptureUIMode.Photo);

    // Convert the captured file to a base64 string
    string base64 = await StorageFileToBase64(file);
    await WebView1.InvokeScriptAsync("LoadImageFromBase64", new string[] { base64 });
}

// Convert a StorageFile to a base64 string
private async Task<string> StorageFileToBase64(StorageFile file)
{
    string Base64String = "";

    if (file != null)
    {
        IRandomAccessStream fileStream = await file.OpenAsync(FileAccessMode.Read);
        var reader = new DataReader(fileStream.GetInputStreamAt(0));
        await reader.LoadAsync((uint)fileStream.Size);

        byte[] byteArray = new byte[fileStream.Size];
        reader.ReadBytes(byteArray);

        Base64String = Convert.ToBase64String(byteArray);
    }

    return Base64String;
}
Displaying the Captured Image in HTML
After obtaining the base64-encoded image, add it to the HTML page using the following function:
function LoadImageFromBase64(base64) {
    if (DWObject) {
        DWObject.LoadImageFromBase64Binary(
            base64,
            Dynamsoft.DWT.EnumDWT_ImageType.IT_ALL
        );
    }
}
Integrating OCR Capabilities
Utilize the Windows Media OCR API
The Windows.Media.Ocr API offers a straightforward interface for Optical Character Recognition (OCR). In this section, we’ll outline how to add OCR capabilities to your UWP application for a selected image.
Retrieve Base64 of Selected Image in HTML
First, add a JavaScript function to obtain the base64-encoded string of the selected image.
function GetSelectedImageInBase64() {
    if (DWObject) {
        DWObject.ConvertToBase64(
            [DWObject.CurrentImageIndexInBuffer],
            Dynamsoft.DWT.EnumDWT_ImageType.IT_PNG,
            function(result, indices, type) {
                var response = {};
                response["info"] = "image_base64";
                response["data"] = result.getData(0, result.getLength());

                window.external.notify(JSON.stringify(response));
            },
            function(errorCode, errorString) {
                console.log(errorString);
            }
        );
    }
}
Implement OCR Functionality in C#
Next, invoke the aforementioned JavaScript function and perform OCR on the base64-encoded image in the C# code.
private async void OCRButton_Click(object sender, RoutedEventArgs e)
{
    await WebView1.InvokeScriptAsync("GetSelectedImageInBase64", new string[] { });
}

private async void WebView1_ScriptNotify(object sender, NotifyEventArgs e)
{
    if (info == "image_base64")
    {
        if (response.ContainsKey("data"))
        {
            string base64 = response.GetValueOrDefault("data", "");
            OCRImageFromBase64(base64);
        }
    }
}

private async void OCRImageFromBase64(string base64)
{
    // Conversion and OCR-related logic
    // ...
    // Display OCR results in a content dialog
    ContentDialog contentDialog = new ContentDialog
    {
        Title = "Result:",
        Content = ocrResult.Text,
        PrimaryButtonText = "Copy to clipboard",
        CloseButtonText = "Close"
    };

    ContentDialogResult result = await contentDialog.ShowAsync();
    if (result == ContentDialogResult.Primary)
    {
        DataPackage dataPackage = new DataPackage();
        dataPackage.SetText(ocrResult.Text);
        Clipboard.SetContent(dataPackage);
    }
}
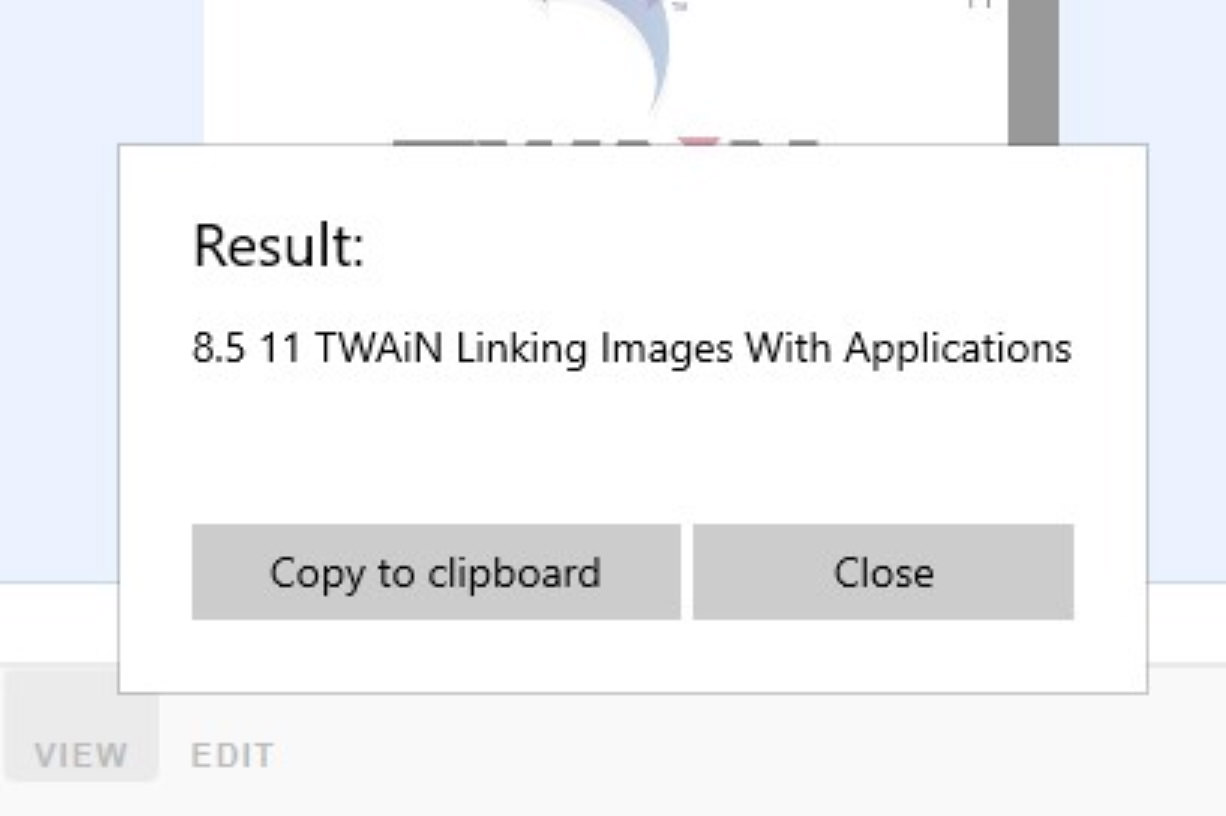
Result and User Interaction
The OCR output will be displayed in a content dialog box. Users have the option to copy the recognized text to their clipboard.
Conclusion
UWP allows developers to build and publish versatile applications across all Windows devices. Following the steps outlined above, you can create a UWP application with robust document scanning functionalities using the Dynamic Web TWAIN SDK.