


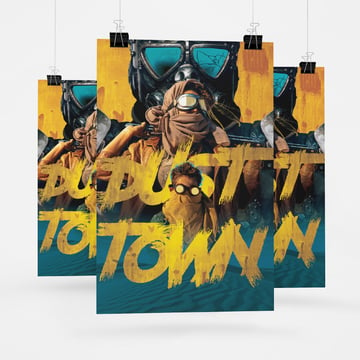
Today we'll learn how to make an action movie poster in Adobe Photoshop. We'll build an action movie poster PSD step by step, creating a composition that can easily be replicated using different actors or models.
If you are looking to create eye-catching action posters in a hurry, try one of the dozens of professional presets and add-ons on Envato Elements. Give your images an action movie poster look in seconds.


What You'll Learn in this Adobe Photoshop Tutorial
- How to make an action movie poster in Photoshop
- How to structure an action movie poster PSD
- What are a movie poster's dimensions?
- How to create action movie typography
- How to color grade an action movie poster
Tutorial Assets
The following assets were used in the production of this tutorial on how to make an action movie poster:
- Concrete Wall With Rust Spots
- Post-Apocalyptic Woman
- Post-Apocalyptic Boy
- Man in Cyborg Costume
- Dunes of Thar Desert
- Furiosa Font
Find more resources for designing a movie poster on Envato Elements!
Jump to content in this section:
1. How to Make an Action Movie Poster in Photoshop
Step 1
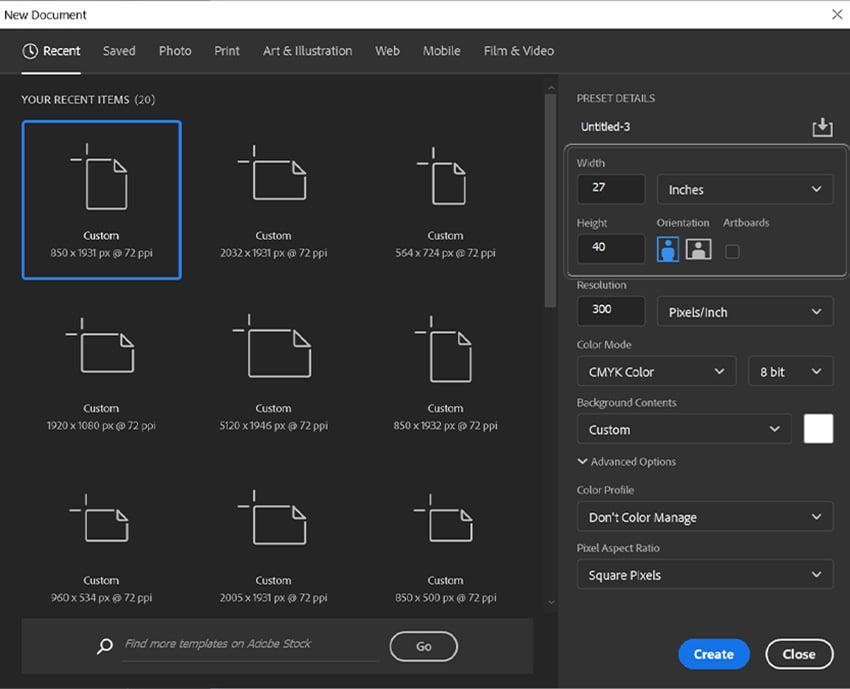
Let's start our action movie poster on Photoshop by creating a new 27 x 40 inch canvas.
If you have no intention of printing this as a full movie poster, then feel free to go smaller, but keep the same ratio.


Step 2
Next, if your design will make it to paper, design in the CMYK Color Mode.
If it will be web-only, then RGB is better for web and other electronic uses. I will be using CMYK for my design today.


Step 3
Finally, if printing, set your DPI or Resolution to 300. This will make sure your image prints nice and sharp. If it will be web-only, then the default 72 is fine.


2. How to Create an Action Movie Poster Design Composition
Step 1
Create a Color Fill layer and fill it with a mustard yellow #d3a033.


Step 2
Take a concrete wall with rust spots texture and place it over the Color Fill layer. If it's like the stock image above, make sure you enlarge it so that only the wall texture is showing.
Turn the texture black and white. I like to use Hue/Saturation for this, but it doesn't matter.


Step 3
Set the texture's layer mode to Overlay.
Duplicate the texture so that it is even more harsh and vivid. This yellow texture will give us a similar look to a Mad Max movie poster.
Group the two textures and the Color Fill layer, naming the group "Background."


Step 4
Next, take your three main subjects and extract them from their backgrounds using your preferred method.
Since I am going for a rough, imperfect look, I used the Select Subject tool. If you need something more precise, you can use the Pen Tool and Refine Edge.
If you only need to place one or two subjects, that's fine! But try to place no more than three, as it can come off too busy otherwise.
Right-Click > Convert to Smart Object all of your subjects so that you can resize them as you go and not have to worry about quality loss or blurriness.


Step 5
Here's a useful tip when designing a movie poster, especially an action movie poster: Place the subjects in order and size of importance. Here is a general guide:
- If featured on the poster, then the villain should be the largest subject. They should be placed overhead, looming over everyone else to show they are a threat.
- If you will only be featuring the main subject, be it a person or item, then they/it should be the largest.
- All side characters should be sized according to their importance to the story.
So in my case, the masked man is the villain, the woman is the hero, and the child is a side character who is important to the story but is not the hero.


Step 6
Next, darken and adjust the contrast of all three of the subjects using a clipped Brightness/Contrast adjustment layer.
You can use Layer Masks to mask out any areas that seem too dark or contrasting.
Masked Man's Settings
- Brightness: -91
- Contrast: -37
- Layer Mask: Mask out the edges of the mask, leaving the inside of the mask white.
Woman's Settings
- Brightness: 18
- Contrast: 34
- Layer Mask: none
Child's Settings
- Brightness: 0
- Contrast: 28
- Layer Mask: none


Step 7
Create and clip a New Layer into the woman, setting the layer to Multiply.
Create a shadow on the lower half of her body using a dark brown color #201512.
You can do this on any subject that needs more separation to stand out amongst the other subjects. In this case, it will help the woman and child not blend into each other.


Step 8
For the subject's hair, create and clip a New Layer into both the woman and child's layer.
Paint using a hard round Brush blue #0099c3 onto the edges of the child's hair and yellow #f7b62c onto the edges of the woman's hair. This will give it a harsh illustrative effect.


Step 9
Now, create and clip a new layer into both the woman's and child's layer, setting it to Lighten.
Fill in the goggles using a hard round Brush set to a light yellow color #ffdb51, giving it a stylized reflection effect.


Step 10
Finish up the subjects by giving the bad guy some blue goggle reflections using a Curves layer. Again, this is in the CMYK color profile. If you are working in RGB, it will be different.


Basically, you just want to make it clear that the child and woman are on the same "team", while the man is not. This is represented by the different colored goggles. Any similar effect will work just as well.
Make sure each subject is in its own group, naming each according to the subject inside. Mine are "Woman", "Child", and "Man"


Step 11
If your subjects are lopsided, like the villain here, try to make them symmetrical. Here I copy and pasted the man's shoulder pad from the left side onto the right side. Since it's armor, it didn't need any precise blending.
This step is optional.


3. How to Use Clipping Masks in Photoshop
Step 1
Create a New Layer between the "Woman" and "Child" group.
Using a large soft round Brush, paint teal blue color #003943 across the canvas, as you can see below.
I will name and refer to the layer as "Fade."


Step 2
Clip an image of sand dunes into the teal gradient by dragging and dropping an image of sand dunes onto the canvas, placing it above the gradient, holding Alt, and then hovering the mouse between the two layers.
When you see a symbol of a box and an arrow appear, then click. The dunes layer should clip into the gradient layer.
Set the sand dunes layer to 50% Opacity.


Step 3
Adjust the dunes using a Hue/Saturation and Brightness/Contrast adjustment layer.
Hue/Saturation Settings
- Hue: 0
- Saturation: -100
Brightness/Contrast Settings
- Brightness: -90
- Contrast: 100


Step 4
Finish up by creating a New Layer above the "Child" group.
Repeat the above two steps on the new layer to hide the bottom edge of the child image. This will be referred to as the second "Fade" layer.


4. How to Create Action Movie Poster Design Typography
Step 1
Now onto the typography, starting with the title of the film!
My title is two words, so I will be splitting the title into two, placing each word on its own layer using the Furiosa Font.
The first word, "Dust", will be placed above the "Woman" group and the first "Fade" layer.
The word "Town" will be placed above the second "fade" layer.
I used the same mustard color #c29c2e as the background fill layer.


Step 2
Copy and paste the same rusty background texture from the background group, keeping them set to Overlay and clipping them into both title words.


Step 3
Create and clip a New Layer into both title words, setting it to Overlay.
Use a soft round Brush to paint white in the middle of each word, and black around the edges, creating a radial gradient effect.
Group each word into its own group, named accordingly. In my case, it's "Dust" and "Town."


5. How to Make an Action Movie Poster Color Grade
Step 1
Finally, in our action poster we have a color grade consisting of four adjustment layers. These will enhance and adjust the current orange and blue color scheme. Orange and blue is a go-to for action movie posters as it's high-contrast and attention-grabbing.
First, create a Curves adjustment layer, with the Cyan curve pulled up into the shadows. The Magentas should be just slightly pulled into the shadows and slightly removed from the highlights. And then create an S curve in the Yellows.


Step 2
Next, use a Levels adjustment layer to slightly increase the contrast by adjusting the toggles, pulling the highlights inward.


Step 3
Add a Hue/Saturation layer to slightly shift the colors' hue into a warming orange and more teal blue.


Step 4
And finally, we need a Selective Color Layer focusing on the Blacks. Add in some Cyan and Magenta and remove just a touch of Yellow. This will make the shadows a nice cold blue and not as green.
If the color grade ends up looking too harsh, group all of the adjustment layers together and bring down the opacity of the group. I set mine to 70% Opacity.


Try an Action Movie Poster Mockup
Finally, even if you won't be printing your poster, you can give people a taste of the real thing using a mockup template like this one on Placeit.


That's It! Now you Know How to Design a Movie Poster!
And that is how to make a movie poster in Photoshop. While this movie poster design in Photoshop tutorial is focused on creating an action poster, you can easily apply the same principles to other genres as well.


If you want to make a quick but effective action poster design that still looks Hollywood-approved, then check out these presets and add-ons from Envato Elements.
Design a Movie Poster on Photoshop: Tutorials and Tips
Head on over to our Envato Tuts+ YouTube channel, where you can learn more about poster design in Photoshop with my free video course Movie Poster Design in Adobe Photoshop.
4 Photoshop Actions to Design a Movie Poster From Envato Elements
If you want to continue creating designs similar to the one in this tutorial or even achieve a similar look to the Mad Max movie poster, continue scrolling because we've got four amazing Photoshop actions from Envato Elements to download for your next movie poster designs.
1. Triple Exposure Photoshop Action (ATN)


The Triple Exposure Photoshop Action will instantly combine three photos to create the ultra-trendy double exposure effect, but plus one! Combine three action-packed images to create a dynamic yet classy action movie poster design.
2. Fervent 2 Photoshop Action (ABR, ATN)


Fervent Action 2 is an action preset that creates an intense instance photo manipulation effect. With deep orange colors and explosive details, it's easy to see how this can be worked into an action movie poster design. Just run the action, add your title, and you are done!
3. Glitch Poster Maker Photoshop Action (ABR, ATN, PAT, PDF, TXT)


This glitch poster maker creates a trendy glitch effect that focuses on a cyberpunk look. Include the glitch effect in your movie's title to tie everything together.
4. Blast Photoshop Action (PSD, ATN)


The Blast Photoshop action tells you everything you need to know about it in its name! It will add orange sparks and flames around your main subjects. However, unlike other spark actions, this preset really lets your model shine, keeping things minimalist and sleek.
Explore More Resources and Tutorials
Looking for more movie poster design in Photoshop tutorials? Check out some more tutorials below:

 How to Create a Melting Portrait Photo Effect Manipulation in Photoshop


 How to Create a Cool Glitch Photo Effect in Adobe Photoshop


 How to Make a Matrix Effect in Photoshop


 How to Create a Cyberpunk Photoshop Effect Action


 How to Create a Living Galaxy Photo Effect in Adobe Photoshop

 How to Create a Smoke Effect Photoshop Action


