Flutter accessibility: Getting started

Accessibility is about making your app as useful for many people as possible. Making your apps accessible makes them easier for everyone to use, including people with visual, mobility, learning, or hearing disabilities. In this tutorial, you’ll learn how to add basic accessibility elements to your Flutter app. In particular, you’ll learn how to:
- Help users with dyslexia.
- Consider people with color blindness.
- Enhance screen readers to assist people with visual disabilities.
- Increase readability by choosing eligible fonts, colors, and contrast.
- Inspect your app using Flutter’s integrated Semantics Debugger.
Google is investing a lot of effort to improve the accessibility of your apps. With a little bit of code from your side, this gets even better!
Getting Started
Download the starter project going to the GitHub repository and checkout the starter branch.
In this tutorial, you’ll work with a simple app to track your money transactions. It allows you to create entries and show your current month’s balance. Open and run the app in your favorite IDE and play around with it.

This tutorial assumes you have basic knowledge of Flutter. If you’re new to Flutter, check out the Flutter documentation. At the very least, you should know how to open a project in your favorite IDE, navigate the source code, initialize your packages with pub get, and run your app in a simulator.
The important files for this tutorial are:
- main.dart: The entry point of the app. In this case, it returns a
MaterialApp, defines the theme, and calls the default route. - data/transaction_data.dart: This global list of
Transactionprovides test data for demonstration purposes. - domain/transaction.dart:
Transactionis the object model. It defines the properties of a transaction. - transaction/item.dart:
TransactionItemshows the attributes of aTransaction. - transaction/modal.dart:
TransactionModalcontains a modal dialog to add a new transaction. - transaction/provider.dart:
TransactionProvidercontains the business logic and state management. It uses theproviderpackage, but your code is independent of state management, anyway. - transaction/screen.dart:
TransactionScreenshows all the transaction items and the current balance. - utils.dart: Contains common utility methods, such as
isNumeric().
Before you start coding, it’s important to know the “what and why” of accessibility.
Why Accessibility Is Important
Accessibility is the practice of making your product usable by as many people as possible. You could think of this as being about people with disabilities, and you’re right, but making apps accessible also increases their overall quality. One key lesson here is to think beyond your own usage of the app and start learning about how other users may use it. The following disabilities should be considered in app development, this is not a complete list but where to start:
- Dyslexia
- Visual impairments
- Hearing impairments
- Mobility impairments
- Cognitive impairments
Making apps accessible not only ensures equal access to the roughly one billion people in the world with disabilities but also benefits people without disabilities by allowing them to customize their experiences. In many countries, accessibility is a right protected by law, just as protections for people based on race, religion, and gender are. Accessibility becomes more of an issue when your app increases in popularity. If you have a lot of users, many of them will need various levels of accommodation. They’ll find your app difficult to interact with, and probably discard it, if your app is not accessible to them. In the next few sections, you’ll learn about specific things to consider for each impairment and how to implement them.
Dyslexia
According to ScienceDirect, Dyslexia “affects 3–7% of the population, however, up to 20% of the general population may have some degree of symptoms”. This makes the selection of your fonts very important to consider. Fortunately, it’s easy to help that 20% of users.

Choose an Accessible Font for Users with Dyslexia
Dyslexia accessibility studies aren’t sure if the most popular font for Dyslexia, OpenDyslexic, actually helps people read faster. Most people prefer Verdana, Helvetica, or any Sans font. To select such a font family, you can use the Google fonts package or import manually your own fonts. For this tutorial choose the OpenSans text theme. It is very similar to the previously mentioned fonts. In pubspec.yaml add the Google fonts package below and aligned it with the provider package. Either click on pub get or run flutter pub get from terminal.
google_fonts: ^2.1.0Then add the following import to the top of lib/main.dart:
import ‘package:google_fonts/google_fonts.dart’;And finally, locate TODO: Add GoogleFonts custom text theme and replace it with the following:
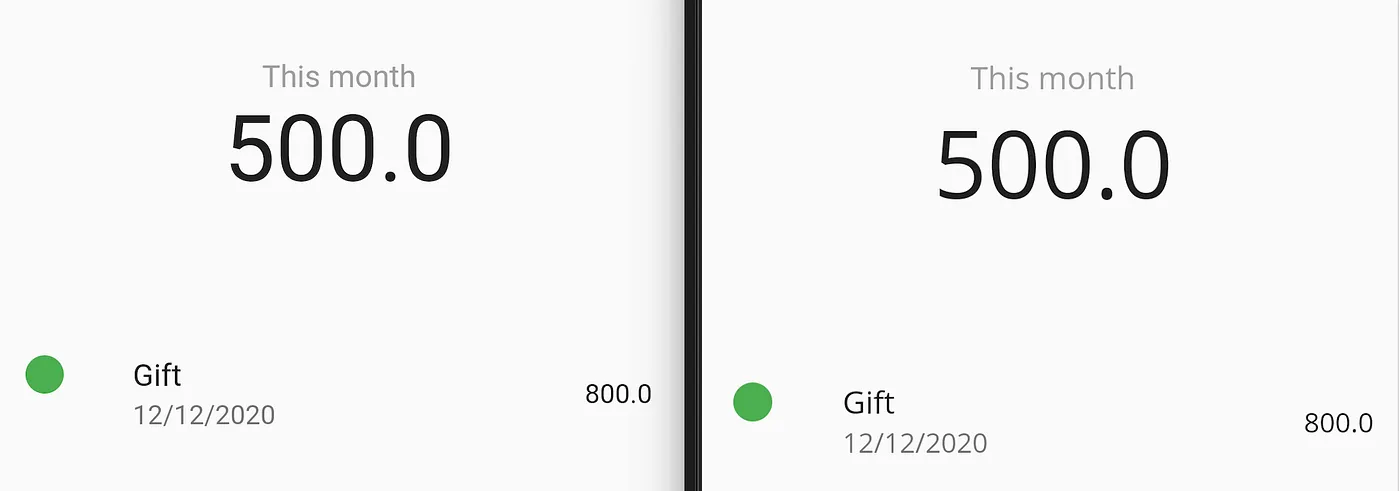
textTheme: GoogleFonts.openSansTextTheme(Theme.of(context).textTheme),You configure GoogleFonts.openSansTextTheme as a base for all text styles in your app. Build and run. You see a slight difference in the font, especially in the digits. On the left, you see the standard font for iOS, on the right OpenSans.
Visual Impairments
Most app UIs focus on how they operate visually. There are different visual impairment types to consider when designing your UI:
- Vision impairments
- Severe vision impairments
- Blindness
To support people with low or no vision, iOS and Android offer screen readers that read out how your app’s UI looks like. It’s up to you to provide enough details to screen readers to let users can interact efficiently with your app. Of course, screen readers aren’t the only way to help people with visual problems. Users with poor eyesight, for example, might not need a screen reader. Instead, larger font sizes and suitable fonts are more helpful.

Font Size is Dynamic by Default
Regarding the font size, you mostly don’t need to change anything. Flutter has accessibility support for larger fonts built-in by default. You can override this behavior by specifying a textScaleFactor. But: Remember that this disables dynamic font size!
If you want to see the dynamic font size in action, use the Accessibility Inspector on iOS or the Accessibility Scanner on Android. Be aware that the largest font sizes can completely ruin the layout of your app and check if the app is still usable.
Consider Your Color Blind Users
According to Color Blind Awareness 4.5% of the population are color-blind. The image below shows some color combinations that are difficult to distinguish for color-blind users.

The top left has the traditional green for ‘good’ and red for ‘bad’ has its disadvantages. As you can see, assuming you aren’t color blind, the top two on the right look the same. So this color combination should be avoided.
In particular, you should not only display error messages in red color but also use an error symbol.
Open transaction_item.dart and locate TODO: Replace green with blue. Change the color of the TransactionIndicator to be like this:
final indicatorColor = transactionType.isExpense() ? Colors.red : Colors.blue;In the code above you change the indicatorColor from Colors.green to Colors.blue, that’s all. Do a hot reload and you see the following changes:

You may find that it doesn’t make a difference, but with this small change you improve the experience of your users. As you can see, improving the accessibility of your app can be done with very little effort. Even with such details, you can increase the number of satisfied users.
Provide Enough Contrast
Sufficient color contrast makes text easier to read. Not only users with visual impairments, but all users will benefit, especially when they use your app in bright sunlight. The W3C recommends At least 4.5:1 for small text (below 18 points regular or 14 points bold). At least 3.0:1 for large text (18 points and above regular or 14 points and above bold).
There are many tools to check the contrast on the web. Just search for a contrast checker.

Flutter’s Semantics Debugger
Screen readers are a very important feature of mobile devices to allow blind people to use your app. Flutter supports both VoiceOver on iOS and TalkBack on Android. The best way to test these screen readers is directly on a device. This is a bit cumbersome. Have you ever heard your colleagues testing VoiceOver on an iPhone at double speed? A more practical approach while developing is activating Flutter’s Semantics Debugger. You’ll do that next.
Give the Screen Readers Additional Semantic Details
Open main.dart and locate TODO: Add showSemanticsDebugger and replace it with the following:
showSemanticsDebugger: true,Here you set the parameter showSemanticsDebugger to true. This switches the app to a quite different view. Do a hot reload and see the resulting screen.

Do you still recognize it? It looks completely different! Now it shows a visual representation of all the details the screen reader provides to the user. All the visual UI is gone. Instead, you see the raw information of the screen’s widgets. If a blind user were to swipe through this screen and listen to the screen reader, they would hear exactly what the Semantics Debugger displays. They would hardly be able to grasp the meaning — the semantics — of the displayed screen content. In the following sections, you will expand on the semantic details of various widgets so that the spoken information makes sense to blind users.
Use Semantic Parameters of Widgets
Flutter adds by default some semantic information to many of the standard widgets like Text, TextField, and more. For a Text widget, it takes its string contents, therefore you see all the text in the Semantics Debugger. But: The FloatingActionButton is only read out as button, not very useful. The button lacks some semantic details — right? You’ll add that in a while.
Some widgets like Text, have parameters that set values of their semantic details. Open transaction_screen.dart and BalanceAmount. Update Text as follows:
You add the semanticsLabel, which describes the meaning of the widget in a complete sentence. This overwrites the previous value of the semantic label, which was just the simple amount.
Wrap Custom Widgets with the Semantics Widget
Custom widgets and many of Flutter’s standard widgets don’t have semantic parameters like Text has. Such widgets you can wrap in Semantics and define the label for that. Open transaction_item.dart and change build() like this:
In the code above, you:
1. Initialize several local variables with values from the transaction data object.
2. No longer return ListTile. Instead, you wrap it in Semanticsand return that.
3. Provide a meaningful text for the label of Semantics.
Semantics has a lot more parameters to define semantic details. You find them all described in the Flutter docs of SemanticsProperies class. For example, you can configure what the screen reader should say when the user taps a button or when the user scrolls.
Do a hot reload and you get the following changes. Note the complete sentences for the balance and the individual items.

Hide Confusing Details With the ExcludeSemantics Widget
If you take a closer look at the transaction items, you see that amount and date are duplicated now. The screen reader will speak these parts twice which would be quite confusing. Don’t fear — Flutter has a widget for that: It’s ExcludeSemantics. This widget drops all the semantics of its descendants. The main goal is to hide information that would otherwise confuse the users. You have two widgets that you’ll hide:
- The text
This month, because it is already contained in thesemanticsLabelofText. - The redundant details information of the transaction items.
First open transaction_screen.dart, find the Text showing This month, and update it like this:
Here you wrap Text in an ExcludeSemantics , that’s all. Next, open transaction_item.dart and find the Semantics widget, you added in a previous section. Update it like this:
Here are some notes about the code above:
1. The child of Semantics is no longer the ListTile. The child is now ExcludeSemantics.
2. All the semantic information inside the ListTile is now excluded by the top widget.
Do a hot reload and the screen will change like this. Notice that the distracting details have disappeared. Looks clear now, right?

Combine Details of Several Widgets With MergeSemantics
The previous two widgets Semantics and ExcludeSemantics are sufficient for most of your semantic enhancements. But in some cases, you may want to join the labels of multiple widgets down the widget tree. Again Flutter has a special widget for this: the MergeSemantics widget. This widget merges the semantics of its descendants. You find an example for this case if you open transaction_modal.dart, find the RadioListTile and cmd + click it on Mac or ctrl + click it on PC. You are now viewing the Flutter framework’s source of RadioListTile. Search for MergeSemantics and you will find the following code:
Here are some notes about this code:
- The
build()ofRadioListTilereturns aMergeSemantics. - The child is a
ListTile. - This
ListTilecontains thetitle. - Because it’s a
RadioListTile, it contains also a leading or a trailing radio button.
So you have a composed widget with a title and a radio button. MergeSemantics merges the title with the semantic state of the radio button, for example, (checked), into a single semantic label. Do a hot reload and tap the + button to see the modal screen in the Semantics Debugger.

You see the title and button state merged for each RadioListTile. It’s displayed for example as transaction type income (checked). Similar merges are done automatically by Flutter for TextFormField and ElevatedButton.
Note: Here you see one of the advantages of Open Source: Because Flutter’s source code is freely available, you can study the details and learn from Flutter’s developers.
Use Tooltip as Semantic Detail
You reach now the button that lacks some semantic details. The semantic information button is just not enough — right? Luckily the FloatingActionButton has the parameter tooltip. This parameter is used for multiple purposes. The given string is shown when the button is long pressed and it adds the missing semantic detail for the screen reader. Open transaction_screen.dart and find the FloatingActionButton. Update it like this:
Here you add the needed information with the parameter tooltip. Do a hot reload and you see the effect in the Semantics Debugger.

Test the Accessibility
Tests regarding accessibility are exclusively integration tests. Unit tests do not make sense, because you need a WidgetTester to render your app. Create a new file semantic_test.dart in folder integration_test and paste the code below.
- You import the necessary packages from the Flutter framework and your main.dart, which contains the
TransactionTrackerApp. - You use
testWidgets()to get aWidgetTester. - With
pumpWidget()you wait until the app is rendered the first time. - The
pumpAndSettle()waits for all animations to be completed. - Finally, you use
bySemanticsLabel()to findSemanticwidgets by a regular expression. In this case, you are expecting three widgets having the semantic labelTransaction.
If you run these tests the app is built and run on a simulator, so be patient. This is not a quick unit test. After a while, you see the following results on your console.

Where to Go From Here?
If you want to check the final result download the completed project going into the GitHub repository and check out the final branch.
If you want to play around with the code some more, you can tell blind users what the income or expense was. The amount and date are not really enough — right? Now you have a very first understanding of accessibility in Flutter. Accessibility is a huge topic that can’t be covered in a single article. If you find this interesting and useful, go to other resources that may be helpful in your accessibility journey.
- Accessibility on flutter.dev
- A guide to Flutter Semantics
- Increase Your Product Quality Through Accessibility
- iOS and Android Accessibility resources — Victoria Gonda
- Android Accessibility by Tutorials
- Dyslexia fonts
If you take accessibility seriously, there is no way around testing on real devices. Both iOS and Android have tools that help you master the nitty-gritty details. I hope you enjoyed this tutorial. If you have any questions or comments, please join the discussion below!