

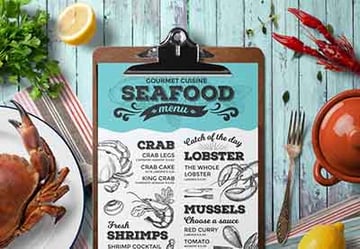
A menu layout can make or break your customers' restaurant experience. A menu design can really define what kind of restaurant you are running. In this tutorial, we show you how to create a restaurant menu design that will put you high on your audience's “must-try restaurants” list.
If you prefer to learn by video instead of text, watch how to make a menu from scratch in Adobe InDesign over on our Envato Tuts+ YouTube channel:

What You Will Need to Create Your InDesign Menu Template
To design a menu, you'll need access to Adobe InDesign. If you don't have the software, you can download a trial from the Adobe website. You'll also need the following assets:
- Seafood elements
- Delichia font (no longer available; try an alternative like Rosabelia)
Download the assets and make sure the font is installed on your system before starting. When you are ready, we can dive into the process of making a menu!
Jump to each step of how to make a menu:
1. How to Set Up an InDesign Menu Template File
Step 1
The first step in designing a menu is to open InDesign. Go to File > New. Name the document Menu Template. We will create A4-size pages for the restaurant menu. Set the format to the following dimensions:
- Width to 29.7 cm
- Height to 21 cm
- Units to Centimeters
- Orientation to Portrait
- Pages to 1
- Uncheck Facing Pages in the restaurant menu
- Columns to 3
- Column Gutter to 0.5 cm
- Margins to 1.8 cm
- Bleeds to 0.3 cm (it's best to seek your professional printer’s preference)
Click Create.


Step 2
For this InDesign menu template tutorial, we will work with four layers. This will make it easier to update the InDesign DIY menu template when it needs different copy, color, or fonts.
Bring up the Layers panel by going to Window > Layers. Double-click on Layer 1 and rename it Background. On the Layers panel main menu, select New Layer. Name the new layer Illustration. Click OK. Create two additional layers and name them Overlay and Copy.


Step 3
Before we start making a menu design for the template, let’s add some color swatches. Head over to Window > Color > Swatches to expand the Swatches panel. Choose the New Color Swatch button from the main menu. Uncheck Name with color value and name each color as shown in the list below:
- Light: C=10 M=5 Y=15 K=5
- Medium: C=0 M=10 Y=25 K=40
- Dark: C=0 M=10 Y=25 K=65
Click Add after you input each color value. Click OK.


2. How to Add Paragraph and Cell Styles to Your InDesign Menu Template
Step 1
Open up the Paragraph Styles panel by going to Windows > Styles > Paragraph Styles. From the main menu, select New Paragraph Style. In the New Paragraph Style options window, set the Style Name to Menu Title. Select Basic Character Formats from the left side menu and use the following settings:
- Font Family: Delichia Sans
- Font Style: Regular
- Size: 14 pt


Now, move down the list and select the Indents and Spacing menu, setting the Alignment to Center. Select the Character Color from the left side menu. Select the Dark color swatch. Click OK.


Perfect! The next thing to learn about how to make a menu is to create a few more styles. Use the following settings for Menu Item style:
- Font Family: Delichia Sans
- Font Style: Regular
- Size: 10 pt
Head over to the Indents and Spacing menu, and set the Alignment to Center. Select the Character Color from the left side of the panel. Select the Dark color swatch. Click OK.
Use the following settings to make a Menu Description style:
- Font Family: Delichia Script
- Font Style: Regular
- Size: 6 pt
Head over to the Indents and Spacing menu, and set the Alignment to Center. Select the Character Color from the left side of the panel. Select the Medium color swatch. Click OK.


Step 2
We will design a menu using tables for easier customization. Let's create a single style for the title of each section. Head over to Window > Styles > Cell Styles to open the Cell Styles panel. From the main menu, select New Cell Style.
Let’s look at the General option on the left side of the Cell Style options window. Set the Style Name to Menu Title Cell. Under Paragraph Style, select the Menu Title style. This means we will be linking the paragraph style we created previously to this cell style.
Select the Text option from the left side. Set the Vertical Justification to Align Center.


Step 3
Select the Strokes and Fills option on the left side of the menu. In the Cell Stroke section, you will notice a diagram of the cell, we need to select which sides of the cell we want to format. In this case, we will only use the top and bottom strokes. Click on the left and right sides of the cell to deactivate the selection, leaving only the top and bottom selected.
Set the Weight to 0.25 pt, set the Color to the Dark swatch, and set the Type to Solid. Click OK.
Deselect the top and bottom sides of the cell and select the left and right sides. Set the Color to [None].


While we won’t be adding more cell styles to design a menu, this is still useful when you want to apply changes. If you update one small detail, all the cells using the same style will update automatically. It's a real time-saver when making a menu!
3. How to Create Vectors and Place Images on Your Menu Design
Step 1
This is an important step when learning how to create a restaurant menu. On the Layers panel, lock the top three layers and leave the Background layer unlocked. Select the Background layer—this is the one we will be working on for now.
Using the Rectangle Tool (M), draw a rectangle covering the whole page. Don’t forget to include the bleeds.
On the Swatches panel, select the Light swatch color.


Step 2
On the Layers panel, lock the Background layer and unlock the Illustration layer.
To Place an image, press Command-D. Locate the Seafood elements JPEG file and click Open.


Step 3
Using the Selection Tool (V), resize the width of the image to cover the bleed. Position the image at the very top of the menu. The image will be short, so we will duplicate it. Press Shift-Option and drag downwards until the image meets the bottom bleed.
Using the Selection Tool (V), resize it by lowering the top center point.


Step 4
Using the Direct Selection Tool (A), select the image within the newly duplicated frame. Move the image until you find the top or any desired position. I suggest using the top as you won’t be cutting off any of the illustrations and will achieve a seamless pattern.


Step 5
On the Layers panel, lock the Illustration layer and unlock the Overlay layer.
Using the Rectangle Tool (M), draw a rectangle. Click on the page to open the Rectangle option window. Set the Width to 18.5 cm and the Height to 27.3 cm. Click OK.


Step 6
Head over to Window > Stroke to open the Stroke panel. Set the Weight to 4 pt. On the Swatches panel, set the Fill color to [Paper] and the Stroke color to [Black].


Step 7
Head over to Window > Objects & Layout > Align. On the Align panel, set the Align To option to Page. Click on the Align Horizontal Center button and the Align Vertical Center button.
Lock the Overlay layer on the Layers panel and unlock the Copy layer.


4. How to Add Text and Tables to Your Menu Design
We've been creating a restaurant menu for a bit, but you can see how it's all taking shape. This is one of our last steps before we see the final product.
Step 1
Select the Ellipse Tool (L), and click on the document to open the Ellipse option window. Set the Width to 12 cm and the Height to 4 cm. Click OK.
On the Swatches panel, set the Fill and Stroke to [None].


Step 2
On the toolbar, select the Type on a Path Tool (Shift-T). Click on the bottom center point of the ellipse and add the title of your menu.
On the Character panel, set the font to Delichia Sans and the Size to 40 pt. On the Color panel, set the color to [Black]. Position the ellipse at the very top of the menu, using the Align panel to align the text to the center of the page.
Lock the ellipse by pressing Command-L.


Step 3
Using the Text Tool (T), add a text frame under the ellipse. Here you can add information such as kitchen opening times, dinner or lunch menu, etc. Using the columns as a guide, create a text frame that fits the width of the center column. This way, the column will be already centered on the page.
Format the text using the Paragraph styles. Select the Menu Item style and set the color on the Swatches panel to [Black].


Step 4
To set the menu, let’s open the Tables panel. Head over to Window > Type & Tables > Table.
Head over to Table > Create Table. In the Create Table option window, set the Body Rows to 4 and Columns to 1. Click OK. Click on the first column to add the table.


Step 5
Double-click on a cell and select all the rows. Head over to the Table panel, and set the Row Height to 1 cm and the Row Width to 4.8 cm. Select the Align Center button and set all the Insets to 0.
While selecting all the rows, head over to the Control bar. Activate all the sides of the table and set the Stroke to [None].


Step 6
You can add vector objects within a text frame. In this case, we will add a four-pointed star. Select the Polygon Tool from the toolbar. Click on the document to open the option window. Use the following settings:
- Polygon Width to 0.15 cm
- Height to 0.15 cm
- Number of Sides to 4
- Star Inset to 50%.
Click OK. Set the Color Fill to the Dark color swatch. Press Command-C to Copy the star.


Step 7
Select the first row and set the style to Menu Title Cell. To add a title to the section, double-click on the row to activate the text frame. Press Command-V to Paste the star, followed by Shift-Command-M to add an Em Space. Add your title and repeat the Em Space, and press Command-V to Paste the star again.


If the stars are sitting too low compared to the height of the text, you can alter the baseline shift. Select the star and head over to the Control bar, and set the Baseline Shift to 2 pt. Repeat the same on the opposite side.


Step 8
Add text to the rows below, using Paragraph Styles to format the text. In this case, I set the first line to the Menu Items style as this can be the name of the dish. The second line can be a description of the dish—I used the Menu Description style.
To duplicate this column, press Shift-Option and drag the column downwards.


Step 9
To create a wider column that can be used for main dishes, duplicate the column by pressing Shift-Option and dragging towards the right. Expand the text box to fit the second and third columns.


Double-click on the table and select all the rows. Head over to the Table panel, and set the Table Width to 10.8 cm.


To add more rows to the table, select the rows and head over to the Table panel. Change the Number of Rows to the number you need.


For this part of making a menu, duplicate the wide table by pressing Shift-Option and dragging downwards. To decrease the number of rows, head over to the Table panel and lower the number. If you would like to add more space to the description rows, increase the Row Height. In this case, I will be increasing it to 1.3 cm.


To occupy the width of the second and third columns, you can either duplicate the wide table or the narrow table. Do so by pressing Shift-Option and dragging downwards. Select all the rows and head over to the Table panel. Set the Number of Columns to 2 and the Column Width to 5.4 cm (this is half of the size of the table above).
In this case, we want the same title for the two columns. Select the first row across the table, and Right-click > Merge Cells.


Duplicate the narrower tables to fit the bottom of the menu. Change the table size to fit half of the width of the menu. Head over to the Control bar and set the Width of the frame to 8.7 cm.
Select all the rows and head over to the Table panel, setting the Column Width to 8 cm. Duplicate the table by pressing Shift-Option and dragging the table to fit the right side of the page.


Step 10
Select the Line Tool (/) and draw a line to divide the sections of the menu as shown in the image below. Use the gutter in the columns to center the lines.
Head over to the Control bar and set the stroke Weight to 0.5 pt. On the Swatches panel, set the Stroke color to the Dark color swatch.


Using the Text Tool (T), create a text box to fit the bottom of the DIY menu template. Here’s a great location to add an address or a website.


5. How to Export an InDesign Menu Template File for Printing
We're done making a menu for a restaurant! Before exporting a file for printing, it is useful to take a look around all the edges of the brochure. This is to make sure all the images and vectors bleeding out are touching the bleeds.
Step 1
To export the file, go to File > Export. Name the file Menu Template and choose Adobe PDF (Print) from the Format drop-down menu. Click Save.


Step 2
In the Export Adobe PDF window, set the Adobe PDF Preset to Press Quality.


On the left side of the panel, select Marks and Bleeds. Check All Printer’s Marks and Use Document Bleed Settings. Click Export. You will have a ready-to-print PDF file after creating a perfect restaurant menu.


Great Job! You’ve Finished This Tutorial!
In this tutorial, I showed you how to make a menu design template in InDesign. With just a few simple tips and tricks, you can now create a restaurant menu design. Today, you learned to:
- set up a ready-to-print InDesign file
- add the pages of the restaurant menu
- create multiple layers and color swatches
- work with the Paragraph Styles panel and create your own styles
- add tables to a document
- create cell styles to format tables
- format tables with the Tables panel


Restaurant Menu Design Templates From Envato Elements
Don't have the time to learn how to create a restaurant menu from scratch? Restaurant templates from Envato Elements are professionally made and can be edited in no time. Here are just a few options you can get from the all-you-can-download platform.
1. Minimal Restaurant Menu Layout (INDD, IDML)


This simple DIY menu template keeps the focus where it should be: on your food. The rows and sections are well organized, and item names and prices are easy to read. You can change up the text and colors with ease with the customizable InDesign files.
2. DIY Trifold Restaurant Menu Template (INDD, EPS)


With this template, you'll see how to make a menu in the most practical way. The trifold file is a cool alternative to more traditional options. It's double sided and has space for a number of different items. You could try using each fold for different food varieties.
3. Restaurant Menu Layout (INDD, IDML)


If you have a lot of food photos, you can create a nice restaurant menu design from this template. It features a cover with an image placeholder, and a menu page layout with photo backgrounds. When making a cool menu that shows off your images, you'll want a template like this one in your corner.
4. InDesign Restaurant Menu Template (INDD, IDML)


Cafe and bistro marketers and owners can use this template when creating a unique restaurant menu. A sharp orange band cuts across the cover and the rest of the DIY menu layout template. Add a picture of a featured dish or your location's ambiance to make it your own.
5. Trifold Restaurant Menu Design Template (INDD, IDML, PSD)


Want to know how to create a restaurant menu effortlessly? Here's another trifold restaurant menu layout that's worth considering. Its design is minimal, with plenty of space for your menu items and prices. But this InDesign menu template also has cool decorative images that break up the blank white folds. Give this DIY menu a try.
Discover More Resources
You just learned how to make a menu, how to design the pages for a restaurant menu, and everything in between. If you are looking for trifold menu templates or specific InDesign templates like bar menu templates, head over to Envato Elements. We’ve got many options to explore!
Looking for more tutorials and ideas on how to create a restaurant menu? Why not try these:

 25+ New Tasty Restaurant & Cafe Menu Templates for 2023


 40 Best Russian Design Tutorials on Envato Tuts+


 30 Restaurant Menu Templates With Creative Designs


 How to Make a Trifold Brochure Pamphlet Template


 25+ Free Restaurant Menu Templates & PSD Mockups

 How to Make a Restaurant Menu Template in InDesign

 29 Delicious Menu Templates for Restaurants & Cafes

 10 Mouth-Watering Restaurant Menu Design Tips


