


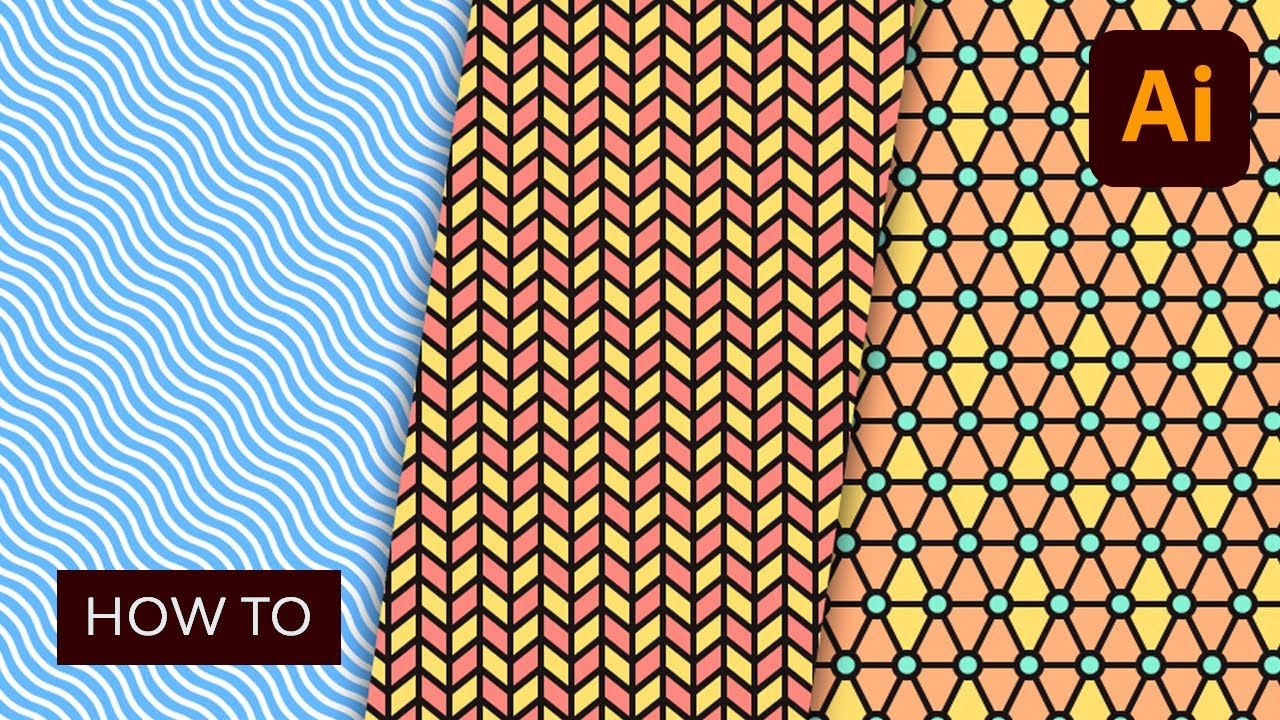
In today’s tutorial, we’re going to take a quick look at the process of creating a set of vector line patterns in Adobe Illustrator, using nothing more than some basic shapes that we’re going to adjust here and there.
So, assuming you already have the software up and running, let’s jump straight into it!
Follow along with us on the Envato Tuts+ YouTube channel:
Looking to download vector line patterns? Check out the following article for our recommendations:
1. How to Set Up a New Project File
As with every new project, we’re going to kick things off by setting up a New Document. So head over to File > New (or use the Control-N keyboard shortcut), and use the following settings:
- Profile: Web
- Number of Artboards: 3
- Spacing: 200 px
- Columns: 3
- Width: 400 px
- Height: 400 px


2. How to Create the First Pattern Variation
Now that we’ve finished setting up our project file, we can start working on our first repeating pattern segment, which we will later use to create the actual pattern.
Step 1
Create the main shape for the background using a 400 x 400 px square, which we will color using #78B9FF and then
center align to the first Artboard
using the Align panel’s Horizontal and Vertical Align Center options.


Step 2
Grab the Pen
Tool (P), and draw a diagonal line using a 4 px thick Stroke
(#FFFFFF) starting from the background’s upper-left corner
and going all the way down to its bottom-right one.


Step 3
Adjust the shape that we’ve just created by heading over to Effect > Distort & Transform and applying a Zig Zag effect with the following settings:
- Size: 4 px
- Absolute: checked
- Ridges per segment: 15
- Points: Smooth


Quick tip: when adjusting the effect, make sure you use an odd number for the Ridges per segment input box since otherwise when you create the larger pattern, your lines won’t align properly.
Step 4
With the resulting shape selected, add the bottom-left lines by right clicking and then going to Transform > Move where we will enter -8 px in the Horizontal value field and 8 px in the Vertical one, making sure to press the Copy button in order to create the first line.


Step 5
Once you have the first copy, simply use the Control-D keyboard shortcut (24 times) to duplicate the action until you've filled in the lower empty space.


Step 6
Add the top-right lines by selecting the initial stroke again, and then going through the same process, making sure to reverse the direction of the Position, by using a value of 8 px for the Horizontal field and -8 px for the Vertical one.
Once you have the first copy, add the remaining ones using the Control-D keyboard shortcut (23 times), making sure to select (Select > Same > Stroke Color) and group all of them together afterwards using the Control-G keyboard shortcut.


Step 7
Finish off the current pattern by creating a copy (Control-C) of the background, which we will paste in front, and then with both it and the diagonal lines selected, simply right click > Make Clipping Mask.
Once you’re done, make sure you select the resulting shapes and the background, and then group (Control-G) them together before moving on to the next pattern.


3. How to Create the Second Pattern Variation
Assuming you’ve finished working on the first pattern’s repeating segment, move on to the neighbouring Artboard, where we will gradually build the next one.
Step 1
Start working on the pattern’s first column of repeating shapes by
creating a 20 x 20 px square, which
we will color using #FFE180 and then position in the bottom-left corner of the Artboard, as seen in the reference image.


Step 2
Adjust the shape that we’ve just created by selecting its right anchor points using the Direct Selection Tool (A), and then pushing them to the bottom by 16 px using the Move tool (right click > Transform > Move > Vertical > 16 px).


Step 3
Give the resulting shape an outline using the Stroke method, by creating a copy (Control-C) of it, which we will then paste in front (Control-F) and adjust by first changing
its color to #191515, and then setting its Stroke Weight to 4 px and its Corner to Round Join. Once you’re done, make sure
you select and group the two shapes together using the Control-G keyboard shortcut.


Step 4
Create the right side of the column using a copy (Control-C > Control-F) of the shapes that we’ve just grouped, which we will vertically reflect (right click > Transform > Reflect > Vertical) and then position as seen in the reference image so that their paths overlap.


Step 5
Add the column’s second row by selecting the shapes that we have so far and then dragging them up while holding down the Shift key (in order to drag in a straight line) and the Alt one (in order to create the duplicates), making sure to flip the colors as seen in the reference image.


Step 6
Create the remaining upper rows by using the select and drag method to create the first instance, and then adding the remaining duplicates using the Control-D keyboard shortcut (nine times), making sure to remove the last row. Take your time, and once you’re done, select and group all of them together using the Control-G keyboard shortcut.


Step 7
Finish off the pattern by adding the remaining nine columns using the select and drag method, making sure to group (Control-G) and then mask them using a 400 x 400 px square (desired shapes selected > right click > Make Clipping Mask).


4. How to Create the Third Pattern Variation
We are now down to our third and last repeating pattern segment, so assuming you’ve already positioned yourself on the remaining Artboard, let’s jump straight into it.
Step 1
Start by creating the main shape for the first row using a 40 x 40 px square, which we will color
using #FFB685 and then position in the bottom-left corner of the Artboard, as seen
in the reference image.


Step 2
Adjust the shape that we’ve just created by adding a new anchor point
to the center of its bottom edge using the Add
Anchor Point Tool (+) and then removing its bottom corner ones using the Delete Anchor Point Tool (-). Give the
resulting shape a 4 px thick outline
(#191515) with a Round Join, making
sure to select and group the two together using the Control-G keyboard shortcut.


Step 3
Create a copy (Control-C > Control-F) of the shapes that we’ve just grouped, which we will horizontally reflect (right click > Transform > Reflect > Horizontal) and then position on top of the original shapes as shown, so that their paths overlap.


Step 4
Add the smaller details using four 16 x 16 px circles (#A0EFD5) with a 4 px thick outline (#191515), which we
will individually group (Control-G)
and then position onto the larger shapes as shown in the reference image. Once
you’re done, make sure you select and group all of
them together using the Control-G
keyboard shortcut.


Step 5
Fill in the row by creating ten overlapping copies using the select and
drag method, making sure to change the color of the inner shape on every second one to #FFE180.


Step 6
Create the second row using ten copies of the orange based triangles, making sure to position them in-between as seen in the reference image.


Step 7
Add the remaining rows using nine instances of the ones that we already have, making sure to adjust the position of the yellow triangles as seen in the reference image. Once you’re done, select and group all of them together using the Control-G keyboard shortcut, making sure to mask them using a 400 x 400 px square (desired shapes selected > right click > Make Clipping Mask).


5. How to Turn the Repeating Pattern Segments Into Actual Patterns
So up to this point we’ve gone through the process of creating three different repeating line pattern variations, which means that now we can finally see how we can turn them into an actual usable pattern.
Step 1
Start by selecting any of the three pattern segments (since the process is identical), and then going to Object > Pattern > Make, which will bring up the following window, where we can fine tune some of its settings. First, let’s give it a custom name.


Step 2
Moving on down, we have Tile Type, which we’ll always want to leave set to Grid, followed by the Width and Height settings, which will automatically be set to that of the Artboard (400 x 400 px) as long as you check the Size Tile to Art option. Leave all the other settings as they are, and then create the pattern by simply clicking on the Done button found underneath the current project tab.


6. How to Use the Patterns You've Created
Okay, so we’ve created the actual patterns, but how do we actually go about using them?
Well, if you open up the Swatches panel, you’ll quickly notice that your new patterns have now been added to your library.


To use any one of them, simply set it as your Fill color and then select the Rectangle Tool (M), and click and drag in order to draw the desired shape.


Great Job!
There you have it, a nice and easy exercise on how to create three different line patterns using some basic shapes.
As always, I hope you had fun working on the project and managed to learn something new and useful during the process. That being said, if you have any questions, feel free to post them in the comments section and I’ll get back to you as soon as I can!


Want to Expand Your Adobe Illustrator Skillbag?!
Just started out using Adobe Illustrator, but haven't quite gotten the hang of it? Learn how to use Adobe Illustrator in our course for beginners, or try these hand-picked tutorials that should get you up and running in no time!

 How to Create Pixel-Perfect Artwork Using Adobe Illustrator


 Understanding Adobe Illustrator's Grid System

 Quick Tip: Advantages of Using the Clipping Mask Over the Pathfinder Panel

 10 Illustrator Tools Every Designer Should Be Using

 40 Best New Line Patterns (Vector & PSD)

Also, don't forget you can always expand your library by heading over to Envato Elements, where you'll find a great selection of vector patterns such as these ones.
Hand Illustrated Line Patterns
A collection of manually tileable line patterns in several flavors and variations so you have a variety to choose from to find the perfect fit for your project. These illustrations offer a naturally imperfect flavor due to their hand-illustrated process.


Simple Line Geometric Patterns
40 Simple Line Geometric Seamless Vector Patterns are ideal for those situations when you need a pattern to complement your designs but not to take the leading role.


Maze Lines Patterns
Funny and positive, these new patterns can flip your design towards success and make your workflow cheerful and enjoyable. The random arrangement of organic, rounded lines creates a maze effect and allows them to act as cool elements in your artworks.


Lines Only Patterns
If you love the bold yet minimal look of a striped background, all with a custom, handmade feel, you have found the right product! They can give your designs a fun, edgy look, and yet they are simple enough to offer you so many creative play options.


